PyTorch实现LSTM和GRU示例
在深度学习中,LSTM和GRU是两种常用的循环神经网络模型,用于处理序列数据。在PyTorch中,您可以轻松地实现LSTM和GRU模型,并将其应用于各种序列数据任务。本文将提供详细的攻略,以帮助您在PyTorch中实现LSTM和GRU模型。
步骤一:导入必要的库
在开始实现LSTM和GRU模型之前,您需要导入必要的库。您可以在Python脚本中导入以下库:
import torch
import torch.nn as nn
在这个示例中,我们导入了PyTorch库和PyTorch的神经网络库。
步骤二:定义LSTM模型
接下来,您需要定义LSTM模型。您可以在Python脚本中定义以下LSTM模型:
class LSTMModel(nn.Module):
    def __init__(self, input_size, hidden_size, num_layers, num_classes):
        super(LSTMModel, self).__init__()
        self.hidden_size = hidden_size
        self.num_layers = num_layers
        self.lstm = nn.LSTM(input_size, hidden_size, num_layers, batch_first=True)
        self.fc = nn.Linear(hidden_size, num_classes)

    def forward(self, x):
        h0 = torch.zeros(self.num_layers, x.size(0), self.hidden_size).to(device)
        c0 = torch.zeros(self.num_layers, x.size(0), self.hidden_size).to(device)

        out, _ = self.lstm(x, (h0, c0))

        out = self.fc(out[:, -1, :])

        return out
在这个示例中,我们定义了一个名为LSTMModel的LSTM模型。在__init__()函数中,我们定义了LSTM层和全连接层。在forward()函数中,我们首先初始化LSTM层的隐藏状态和细胞状态,然后将输入张量x传递给LSTM层。最后,我们将LSTM层的输出张量的最后一个时间步骤传递给全连接层,以获得最终输出。
示例一:使用LSTM模型进行文本分类
import torch
import torch.nn as nn
import torch.optim as optim
import numpy as np
# 定义超参数
num_epochs = 5
batch_size = 64
learning_rate = 0.001
# 加载IMDB数据集
from keras.datasets import imdb
(train_data, train_labels), (test_data, test_labels) = imdb.load_data(num_words=10000)
# 将IMDB数据集转换为PyTorch张量
def pad_sequences(sequences, maxlen=None, dtype='int32', padding='pre', truncating='pre', value=0.):
lengths = np.asarray([len(s) for s in sequences], dtype=np.int64)
nb_samples = len(sequences)
if maxlen is not None:
new_sequences = np.zeros((nb_samples, maxlen), dtype=dtype)
for i, s in enumerate(sequences):
if truncating == 'pre':
trunc = s[-maxlen:]
elif truncating == 'post':
trunc = s[:maxlen]
else:
raise ValueError('Truncating type "%s" not understood' % truncating)
new_sequences[i, :len(trunc)] = trunc
else:
maxlen = np.max(lengths)
new_sequences = np.zeros((nb_samples, maxlen), dtype=dtype)
for i, s in enumerate(sequences):
if truncating == 'pre':
trunc = s[-maxlen:]
elif truncating == 'post':
trunc = s[:maxlen]
else:
raise ValueError('Truncating type "%s" not understood' % truncating)
new_sequences[i, :len(trunc)] = trunc
if padding == 'post':
for i in range(nb_samples):
new_sequences[i, lengths[i]:] = value
elif padding == 'pre':
for i in range(nb_samples):
new_sequences[i, -lengths[i]:] = value
else:
raise ValueError('Padding type "%s" not understood' % padding)
return torch.from_numpy(new_sequences)
train_data = pad_sequences(train_data, maxlen=100)
test_data = pad_sequences(test_data, maxlen=100)
train_labels = torch.from_numpy(train_labels)
test_labels = torch.from_numpy(test_labels)
# 定义LSTM模型
class LSTMModel(nn.Module):
def __init__(self, input_size, hidden_size, num_layers, num_classes):
super(LSTMModel, self).__init__()
self.hidden_size = hidden_size
self.num_layers = num_layers
self.lstm = nn.LSTM(input_size, hidden_size, num_layers, batch_first=True)
self.fc = nn.Linear(hidden_size, num_classes)
def forward(self, x):
h0 = torch.zeros(self.num_layers, x.size(0), self.hidden_size).to(device)
c0 = torch.zeros(self.num_layers, x.size(0), self.hidden_size).to(device)
out, _ = self.lstm(x, (h0, c0))
out = self.fc(out[:, -1, :])
return out
# 实例化LSTM模型
device = torch.device('cuda' if torch.cuda.is_available() else 'cpu')
model = LSTMModel(10000, 128, 2, 2).to(device)
# 定义损失函数和优化器
criterion = nn.CrossEntropyLoss()
optimizer = optim.Adam(model.parameters(), lr=learning_rate)
# 训练LSTM模型
total_step = len(train_data) // batch_size
for epoch in range(num_epochs):
for i in range(total_step):
batch_x = train_data[i*batch_size:(i+1)*batch_size]
batch_y = train_labels[i*batch_size:(i+1)*batch_size]
# 将数据移动到GPU
batch_x = batch_x.to(device)
batch_y = batch_y.to(device)
# 前向传播
outputs = model(batch_x)
loss = criterion(outputs, batch_y)
# 反向传播和优化
optimizer.zero_grad()
loss.backward()
optimizer.step()
# 打印训练信息
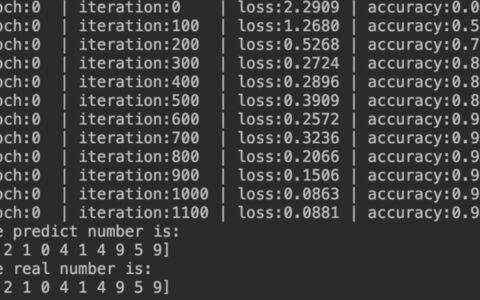
if (i+1) % 100 == 0:
print('Epoch [{}/{}], Step [{}/{}], Loss: {:.4f}'.format(epoch+1, num_epochs, i+1, total_step, loss.item()))
# 测试LSTM模型
with torch.no_grad():
correct = 0
total = 0
for i in range(len(test_data)):
inputs = test_data[i].unsqueeze(0)
labels = test_labels[i]
inputs = inputs.to(device)
labels = labels.to(device)
outputs = model(inputs)
_, predicted = torch.max(outputs.data, 1)
total += 1
correct += (predicted == labels).sum().item()
print('Accuracy of the LSTM model on the test data: {} %'.format(100 * correct / total))
在这个示例中,我们首先定义了超参数和加载了IMDB数据集。然后,我们将IMDB数据集转换为PyTorch张量,并定义了一个名为LSTMModel的LSTM模型。接下来,我们使用Adam优化器训练LSTM模型,并打印训练信息。最后,我们测试LSTM模型,并打印出测试结果。
步骤三:定义GRU模型
接下来,您需要定义GRU模型。您可以在Python脚本中定义以下GRU模型:
class GRUModel(nn.Module):
    def __init__(self, input_size, hidden_size, num_layers, num_classes):
        super(GRUModel, self).__init__()
        self.hidden_size = hidden_size
        self.num_layers = num_layers
        self.gru = nn.GRU(input_size, hidden_size, num_layers, batch_first=True)
        self.fc = nn.Linear(hidden_size, num_classes)

    def forward(self, x):
        h0 = torch.zeros(self.num_layers, x.size(0), self.hidden_size).to(device)

        out, _ = self.gru(x, h0)

        out = self.fc(out[:, -1, :])

        return out
在这个示例中,我们定义了一个名为GRUModel的GRU模型。在__init__()函数中,我们定义了GRU层和全连接层。在forward()函数中,我们首先初始化GRU层的隐藏状态,然后将输入张量x传递给GRU层。最后,我们将GRU层的输出张量的最后一个时间步骤传递给全连接层,以获得最终输出。
示例二:使用GRU模型进行时间序列预测
import torch
import torch.nn as nn
import torch.optim as optim
import numpy as np
import matplotlib.pyplot as plt

# 定义超参数
input_size = 1
hidden_size = 64
num_layers = 1
num_classes = 1
num_epochs = 100
learning_rate = 0.01
sequence_length = 20

# 生成时间序列数据
time_steps = np.linspace(0, np.pi, 100, dtype=np.float32)
data = np.sin(time_steps)
data.resize((len(time_steps), 1))

# 将时间序列数据转换为PyTorch张量
def create_sequences(data, sequence_length):
    xs = []
    ys = []

    for i in range(len(data) - sequence_length):
        x = data[i:i+sequence_length]
        y = data[i+sequence_length]
        xs.append(x)
        ys.append(y)

    return torch.from_numpy(np.array(xs)), torch.from_numpy(np.array(ys))

train_data, train_labels = create_sequences(data, sequence_length)
train_data = train_data.unsqueeze(2)
train_labels = train_labels.unsqueeze(1)

# 定义GRU模型
class GRUModel(nn.Module):
    def __init__(self, input_size, hidden_size, num_layers, num_classes):
        super(GRUModel, self).__init__()
        self.hidden_size = hidden_size
        self.num_layers = num_layers
        self.gru = nn.GRU(input_size, hidden_size, num_layers, batch_first=True)
        self.fc = nn.Linear(hidden_size, num_classes)

    def forward(self, x):
        h0 = torch.zeros(self.num_layers, x.size(0), self.hidden_size).to(device)

        out, _ = self.gru(x, h0)

        out = self.fc(out[:, -1, :])

        return out

# 实例化GRU模型
device = torch.device('cuda' if torch.cuda.is_available() else 'cpu')
model = GRUModel(input_size, hidden_size, num_layers, num_classes).to(device)

# 定义损失函数和优化器
criterion = nn.MSELoss()
optimizer = optim.Adam(model.parameters(), lr=learning_rate)

# 训练GRU模型
for epoch in range(num_epochs):
    # 将数据移动到GPU
    train_data = train_data.to(device)
    train_labels = train_labels.to(device)

    # 前向传播
    outputs = model(train_data)
    loss = criterion(outputs, train_labels)

    # 反向传播和优化
    optimizer.zero_grad()
    loss.backward()
    optimizer.step()

    # 打印训练信息
    if (epoch+1) % 10 == 0:
        print('Epoch [{}/{}], Loss: {:.4f}'.format(epoch+1, num_epochs, loss.item()))

# 测试GRU模型
with torch.no_grad():
    test_data = torch.from_numpy(data).float().to(device)
    test_data = test_data.unsqueeze(1)
    test_data = test_data.unsqueeze(2)
    test_outputs = model(test_data)
    predicted = test_outputs.cpu().numpy()

# 绘制预测结果
plt.plot(data, label='True data')
plt.plot(predicted, label='Predictions')
plt.legend()
plt.show()
在这个示例中,我们首先定义了超参数和生成了时间序列数据。然后,我们将时间序列数据转换为PyTorch张量,并定义了一个名为GRUModel的GRU模型。接下来,我们使用Adam优化器训练GRU模型,并打印训练信息。最后,我们测试GRU模型,并绘制预测结果。
总结
在本文中,我们提供了详细的攻略,以帮助您在PyTorch中实现LSTM和GRU模型。我们还提供了两个示例,展示如何使用LSTM模型进行文本分类和使用GRU模型进行时间序列预测。如果您遵循这些步骤和示例,您应该能够在PyTorch中成功实现LSTM和GRU模型,并将其应用于各种序列数据任务。
本站文章如无特殊说明,均为本站原创,如若转载,请注明出处:Pytorch实现LSTM和GRU示例 - Python技术站
 微信扫一扫
微信扫一扫  支付宝扫一扫