https://blog.csdn.net/houchaoqun_xmu/article/details/78492718
前言:
keras 源码中下载MNIST的方式是 path = get_file(path, origin='https://s3.amazonaws.com/img-datasets/mnist.npz'),数据源是通过 url = https://s3.amazonaws.com/img-datasets/mnist.npz 进行下载的。访问该 url 地址被墙了,导致 MNIST 相关的案例都卡在数据下载的环节。本文主要提供解决方案,让需要的读者可以跑案例的代码感受一下。
本文的贡献主要包括如下:
1)提供 mnist_npz 数据集;
2)分析了关于 mnist 几个相关的源代码;
3)提供了一种能够顺利运行 keras 源码中 example 下 mnist 的相关案例;
4)找到了另外几种解决方案,提供了相关的链接。
numpy.load(path)
numpy.load() 函数起到很重要的作用。它可以读取 .npy .npz 等文件类型,并返回对应的数据类型。
1)如果文件类型是 .pny 则返回一个1维数组。
2)如果文件类型是 .npz 则返回一个类似字典的数据类型,包含 {filename: array} 键值对。如,本例中的键值对如下所示:
-
f = np.load(path)
-
x_train, y_train = f['x_train'], f['y_train']
-
x_test, y_test = f['x_test'], f['y_test']
-
f.close()
详情请参考:https://docs.scipy.org/doc/numpy/reference/generated/numpy.load.html

原始 .\keras\examples\mnist_mlp.py
-
# -*- coding: utf-8 -*-
-
'''Trains a simple deep NN on the MNIST dataset.
-
-
Gets to 98.40% test accuracy after 20 epochs
-
(there is *a lot* of margin for parameter tuning).
-
2 seconds per epoch on a K520 GPU.
-
'''
-
-
from __future__ import print_function
-
-
import keras
-
from keras.datasets import mnist
-
from keras.models import Sequential
-
from keras.layers import Dense, Dropout
-
from keras.optimizers import RMSprop
-
-
-
batch_size = 128
-
num_classes = 10
-
epochs = 20
-
-
# the data, shuffled and split between train and test sets
-
(x_train, y_train), (x_test, y_test) = mnist.load_data()
-
-
x_train = x_train.reshape(60000, 784)
-
x_test = x_test.reshape(10000, 784)
-
x_train = x_train.astype('float32')
-
x_test = x_test.astype('float32')
-
x_train /= 255
-
x_test /= 255
-
print(x_train.shape[0], 'train samples')
-
print(x_test.shape[0], 'test samples')
-
-
# convert class vectors to binary class matrices
-
y_train = keras.utils.to_categorical(y_train, num_classes)
-
y_test = keras.utils.to_categorical(y_test, num_classes)
-
-
model = Sequential()
-
model.add(Dense(512, activation='relu', input_shape=(784,)))
-
model.add(Dropout(0.2))
-
model.add(Dense(512, activation='relu'))
-
model.add(Dropout(0.2))
-
model.add(Dense(10, activation='softmax'))
-
-
model.summary()
-
-
###
-
# 1)categorical_crossentropy(output, target, from_logits=False):
-
# 计算输出张量和目标张量的Categorical crossentropy(类别交叉熵),目标张量与输出张量必须shape相同。
-
# 多分类的对数损失函数,与softmax分类器相对应的。
-
#
-
# 2)RMSprop()
-
# AdaGrad算法的改进。鉴于神经网络都是非凸条件下的,RMSProp在非凸条件下结果更好,改变梯度累积为指数衰减的移动平均以丢弃遥远的过去历史。
-
# reference:http://blog.csdn.net/bvl10101111/article/details/72616378
-
#
-
model.compile(loss='categorical_crossentropy',
-
optimizer=RMSprop(),
-
metrics=['accuracy'])
-
-
history = model.fit(x_train, y_train,
-
batch_size=batch_size,
-
epochs=epochs,
-
verbose=1,
-
validation_data=(x_test, y_test))
-
score = model.evaluate(x_test, y_test, verbose=0)
-
print('Test loss:', score[0])
-
print('Test accuracy:', score[1])
.\keras\keras\datasets\mnist.py - load_data()
-
# -*- coding: utf-8 -*-
-
from ..utils.data_utils import get_file
-
import numpy as np
-
-
def load_data(path='mnist.npz'):
-
"""Loads the MNIST dataset.
-
-
# Arguments
-
path: path where to cache the dataset locally
-
(relative to ~/.keras/datasets).
-
-
# Returns
-
Tuple of Numpy arrays: `(x_train, y_train), (x_test, y_test)`.
-
-
# numpy.load()
-
# numpy.load(file, mmap_mode=None, allow_pickle=True, fix_imports=True, encoding='ASCII')
-
# 1) Load arrays or pickled objects from .npy, .npz or pickled files
-
# 2)
-
# reference: https://docs.scipy.org/doc/numpy/reference/generated/numpy.load.html
-
-
"""
-
path = get_file(path, origin='https://s3.amazonaws.com/img-datasets/mnist.npz')
-
f = np.load(path)
-
x_train, y_train = f['x_train'], f['y_train']
-
x_test, y_test = f['x_test'], f['y_test']
-
f.close()
-
return (x_train, y_train), (x_test, y_test)
下载 mnist.npz 数据集
本文使用的 mnist.npz 数据集是通过一个 japan 的服务器下载得到的,在此免费分享给大家。如果下载有问题的话,可以留言哈。
下载链接:https://pan.baidu.com/s/1jH6uFFC 密码: dw3d
改造 mnist_mlp.py
方法1:
mnist_mlp.py 源码是使用如下命令获取数据集:
-
# the data, shuffled and split between train and test sets
-
(x_train, y_train), (x_test, y_test) = mnist.load_data()
调用的是 .\keras\keras\datasets\mnist.py 脚本中的 def load_data(path='mnist.npz') 函数,也就是因为网址被墙了导致不能正常运行的原因。本文事先下好了 mnist.npz 数据集,然后改动了一些代码使之正常运行。换句话说,本文使用的是“读取本地数据集”的方法,步骤如下:
1)下载好 mnist_npz 数据集,并将其放于 .\keras\examples 目录下。
2)改动后的 mnist_mlp.py 代码如下:
-
# -*- coding: utf-8 -*-
-
'''Trains a simple deep NN on the MNIST dataset.
-
-
Gets to 98.40% test accuracy after 20 epochs
-
(there is *a lot* of margin for parameter tuning).
-
2 seconds per epoch on a K520 GPU.
-
'''
-
-
from __future__ import print_function
-
-
import keras
-
from keras.datasets import mnist
-
from keras.models import Sequential
-
from keras.layers import Dense, Dropout
-
from keras.optimizers import RMSprop
-
-
batch_size = 128
-
num_classes = 10
-
epochs = 20
-
-
# the data, shuffled and split between train and test sets
-
# (x_train, y_train), (x_test, y_test) = mnist.load_data()
-
-
import numpy as np
-
path='./mnist.npz'
-
f = np.load(path)
-
x_train, y_train = f['x_train'], f['y_train']
-
x_test, y_test = f['x_test'], f['y_test']
-
f.close()
-
-
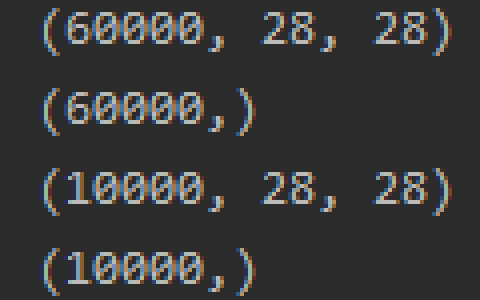
x_train = x_train.reshape(60000, 784).astype('float32')
-
x_test = x_test.reshape(10000, 784).astype('float32')
-
x_train /= 255
-
x_test /= 255
-
print(x_train.shape[0], 'train samples')
-
print(x_test.shape[0], 'test samples')
-
-
# convert class vectors to binary class matrices
-
# label为0~9共10个类别,keras要求格式为binary class matrices
-
-
y_train = keras.utils.to_categorical(y_train, num_classes)
-
y_test = keras.utils.to_categorical(y_test, num_classes)
-
-
# add by hcq-20171106
-
# Dense of keras is full-connection.
-
model = Sequential()
-
model.add(Dense(512, activation='relu', input_shape=(784,)))
-
model.add(Dropout(0.2))
-
model.add(Dense(512, activation='relu'))
-
model.add(Dropout(0.2))
-
model.add(Dense(num_classes, activation='softmax'))
-
-
model.summary()
-
-
model.compile(loss='categorical_crossentropy',
-
optimizer=RMSprop(),
-
metrics=['accuracy'])
-
-
history = model.fit(x_train, y_train,
-
batch_size=batch_size,
-
epochs=epochs,
-
verbose=1,
-
validation_data=(x_test, y_test))
-
score = model.evaluate(x_test, y_test, verbose=0)
-
print('Test loss:', score[0])
-
print('Test accuracy:', score[1])
运行效果如下所示:
-
60000 train samples
-
10000 test samples
-
_________________________________________________________________
-
Layer (type) Output Shape Param #
-
=================================================================
-
dense_1 (Dense) (None, 512) 401920
-
_________________________________________________________________
-
dropout_1 (Dropout) (None, 512) 0
-
_________________________________________________________________
-
dense_2 (Dense) (None, 512) 262656
-
_________________________________________________________________
-
dropout_2 (Dropout) (None, 512) 0
-
_________________________________________________________________
-
dense_3 (Dense) (None, 10) 5130
-
=================================================================
-
Total params: 669,706
-
Trainable params: 669,706
-
Non-trainable params: 0
-
_________________________________________________________________
-
Train on 60000 samples, validate on 10000 samples
-
Epoch 1/20
-
2017-11-09 23:06:16.881800: I tensorflow/core/common_runtime/gpu/gpu_device.cc:977] Creating TensorFlow device (/gpu:0) -> (device: 0, name: GeForce GTX 1080 Ti, pci bus id: 0000:01:00.0)
-
-
-
-
60000/60000 [==============================] - 1s 23us/step - loss: 0.0387 - acc: 0.9888 - val_loss: 0.0706 - val_acc: 0.9814
-
Epoch 8/20
-
60000/60000 [==============================] - 1s 23us/step - loss: 0.0341 - acc: 0.9899 - val_loss: 0.0789 - val_acc: 0.9827
-
Epoch 9/20
-
60000/60000 [==============================] - 1s 23us/step - loss: 0.0304 - acc: 0.9911 - val_loss: 0.0851 - val_acc: 0.9833
-
Epoch 10/20
-
60000/60000 [==============================] - 1s 23us/step - loss: 0.0290 - acc: 0.9918 - val_loss: 0.0867 - val_acc: 0.9818
-
Epoch 11/20
-
60000/60000 [==============================] - 1s 23us/step - loss: 0.0264 - acc: 0.9924 - val_loss: 0.0881 - val_acc: 0.9833
-
Epoch 12/20
-
60000/60000 [==============================] - 1s 23us/step - loss: 0.0261 - acc: 0.9928 - val_loss: 0.1095 - val_acc: 0.9801
-
Epoch 13/20
-
60000/60000 [==============================] - 1s 23us/step - loss: 0.0246 - acc: 0.9931 - val_loss: 0.1012 - val_acc: 0.9830
-
Epoch 14/20
-
60000/60000 [==============================] - 1s 23us/step - loss: 0.0233 - acc: 0.9935 - val_loss: 0.1116 - val_acc: 0.9812
-
Epoch 15/20
-
60000/60000 [==============================] - 1s 23us/step - loss: 0.0223 - acc: 0.9942 - val_loss: 0.1016 - val_acc: 0.9832
-
Epoch 16/20
-
60000/60000 [==============================] - 1s 23us/step - loss: 0.0214 - acc: 0.9943 - val_loss: 0.1053 - val_acc: 0.9832
-
Epoch 17/20
-
60000/60000 [==============================] - 1s 23us/step - loss: 0.0178 - acc: 0.9950 - val_loss: 0.1095 - val_acc: 0.9838
-
Epoch 18/20
-
60000/60000 [==============================] - 1s 23us/step - loss: 0.0212 - acc: 0.9949 - val_loss: 0.1158 - val_acc: 0.9822
-
Epoch 19/20
-
60000/60000 [==============================] - 1s 23us/step - loss: 0.0197 - acc: 0.9951 - val_loss: 0.1112 - val_acc: 0.9831
-
Epoch 20/20
-
60000/60000 [==============================] - 1s 23us/step - loss: 0.0203 - acc: 0.9951 - val_loss: 0.1097 - val_acc: 0.9833
-
Test loss: 0.109655842465
-
Test accuracy: 0.9833
方法2:参考该【博文】
(x_train, y_train), (x_test, y_test) = mnist.load_data(path='/home/duchao/下载/mnist.npz')
Reference:
keras 中文文档:http://keras-cn.readthedocs.io/en/latest/
阅读源码遇到的一些TF、keras函数及问题:http://blog.csdn.net/jsliuqun/article/details/64444302
python读取mnist数据集:https://blog.mythsman.com/2016/01/25/1/
本站文章如无特殊说明,均为本站原创,如若转载,请注明出处:如何使用keras加载下载好的数据集 - Python技术站
 微信扫一扫
微信扫一扫  支付宝扫一扫