
今天咸鱼给大家分享个源码编译安装 Nginx 的 shell 脚本
这个 shell 脚本可重复执行
完整源码放在最后
-
定义一个变量来存放 nginx 版本号
version=1.15.4
nginx 下载地址:http://nginx.org/download/
-
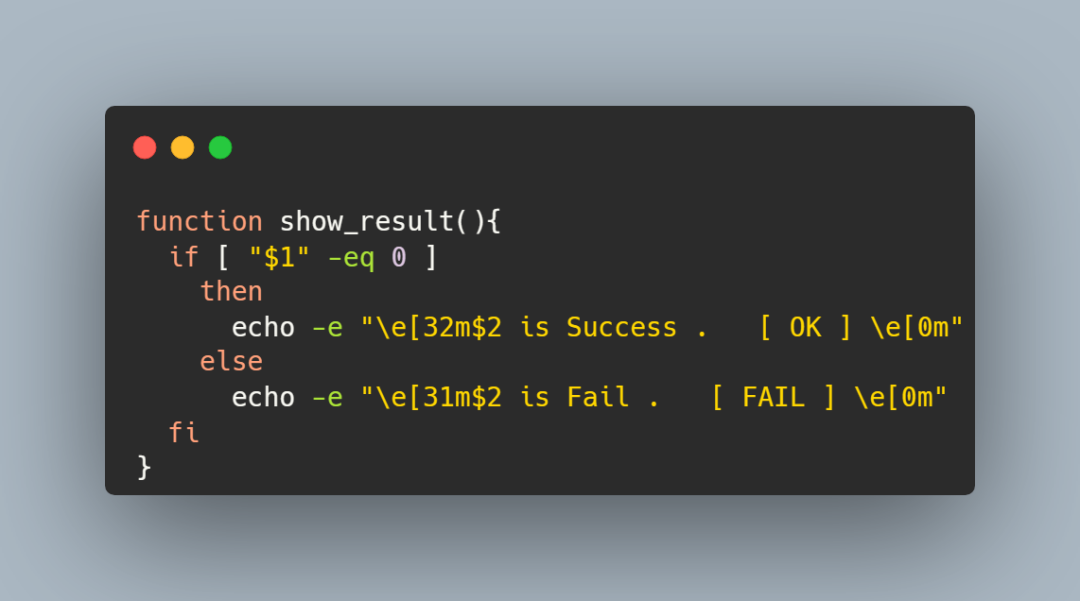
下列函数功能则是判断当前步骤是否执行成功,并将结果输出出来

-
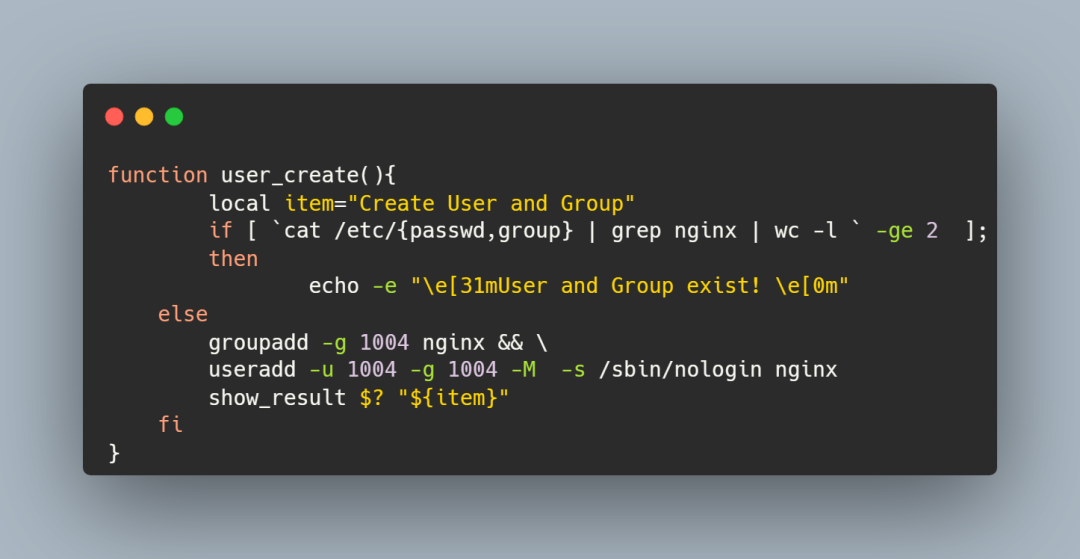
创建 nginx 用户和用户组
建议用大于 1000 的 GID 和 UID 号,表示普通用户
这段代码里我做了一个条件判断:
如果在 /etc/passwd 和 /etc/group 文件中过滤出 nginx,表示已经创建了 nginx 用户和 nginx 用户组,就不再创建了
-
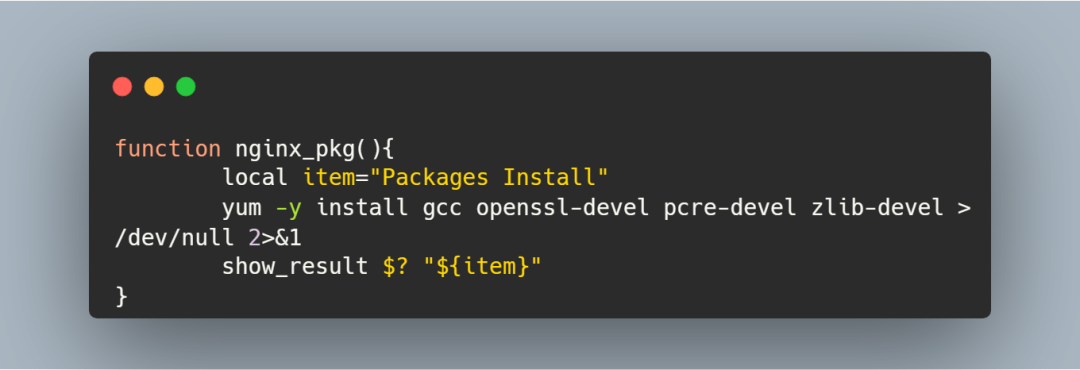
安装一些扩展包
-
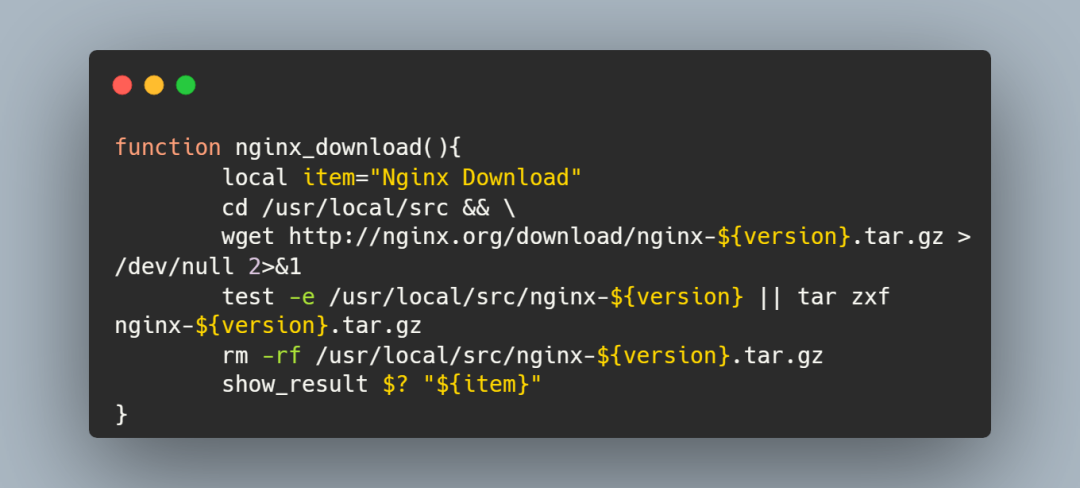
下载 Nginx 并解压缩
-
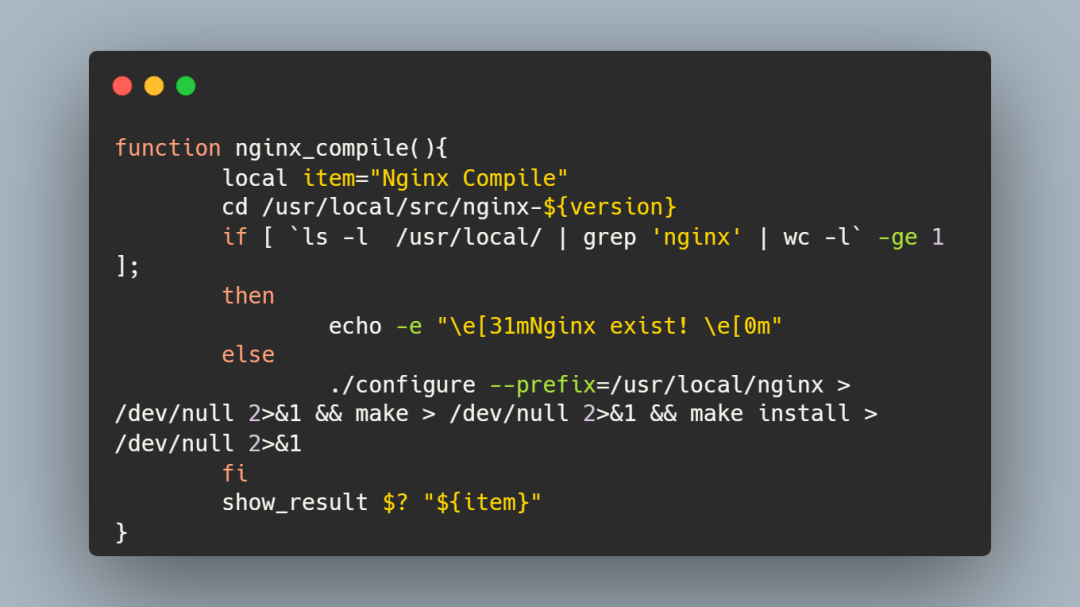
编译安装 Nginx
这里也做了一个条件判断:
如果 /usr/local/nginx 目录存在,则说明 nginx 已经成功安装好了
-
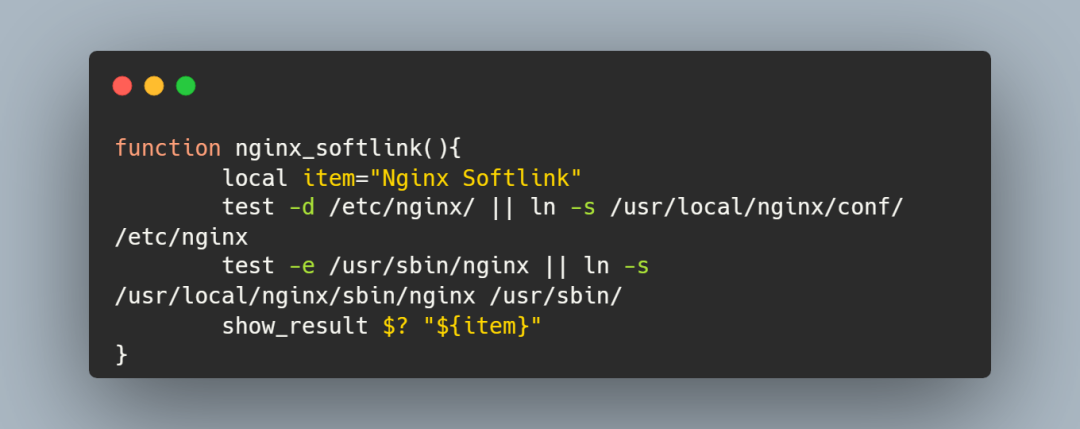
建立软连接
这一步看个人习惯可做可不做
-
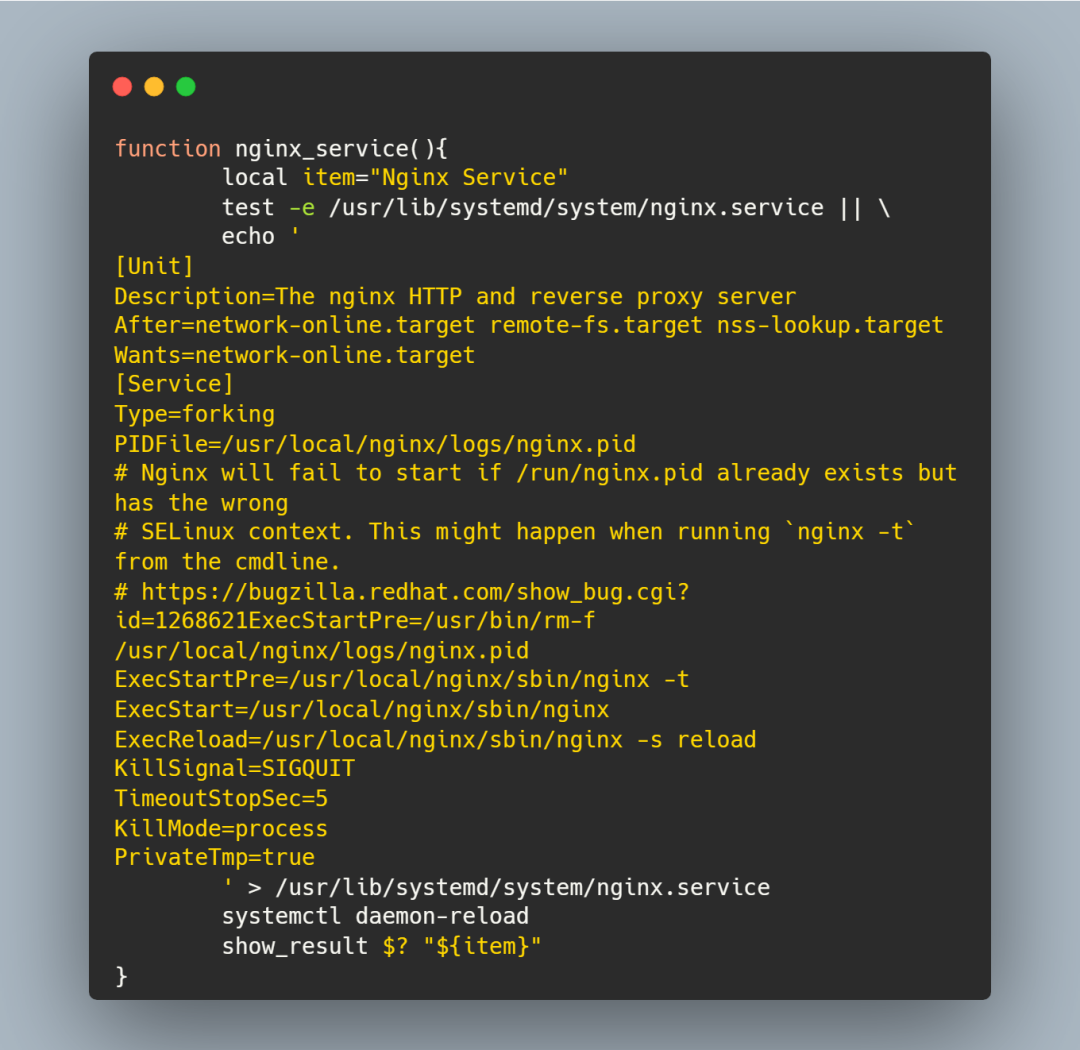
注册服务
将 nginx 注册成服务之后就可以使用 systemctl 控制它了
-
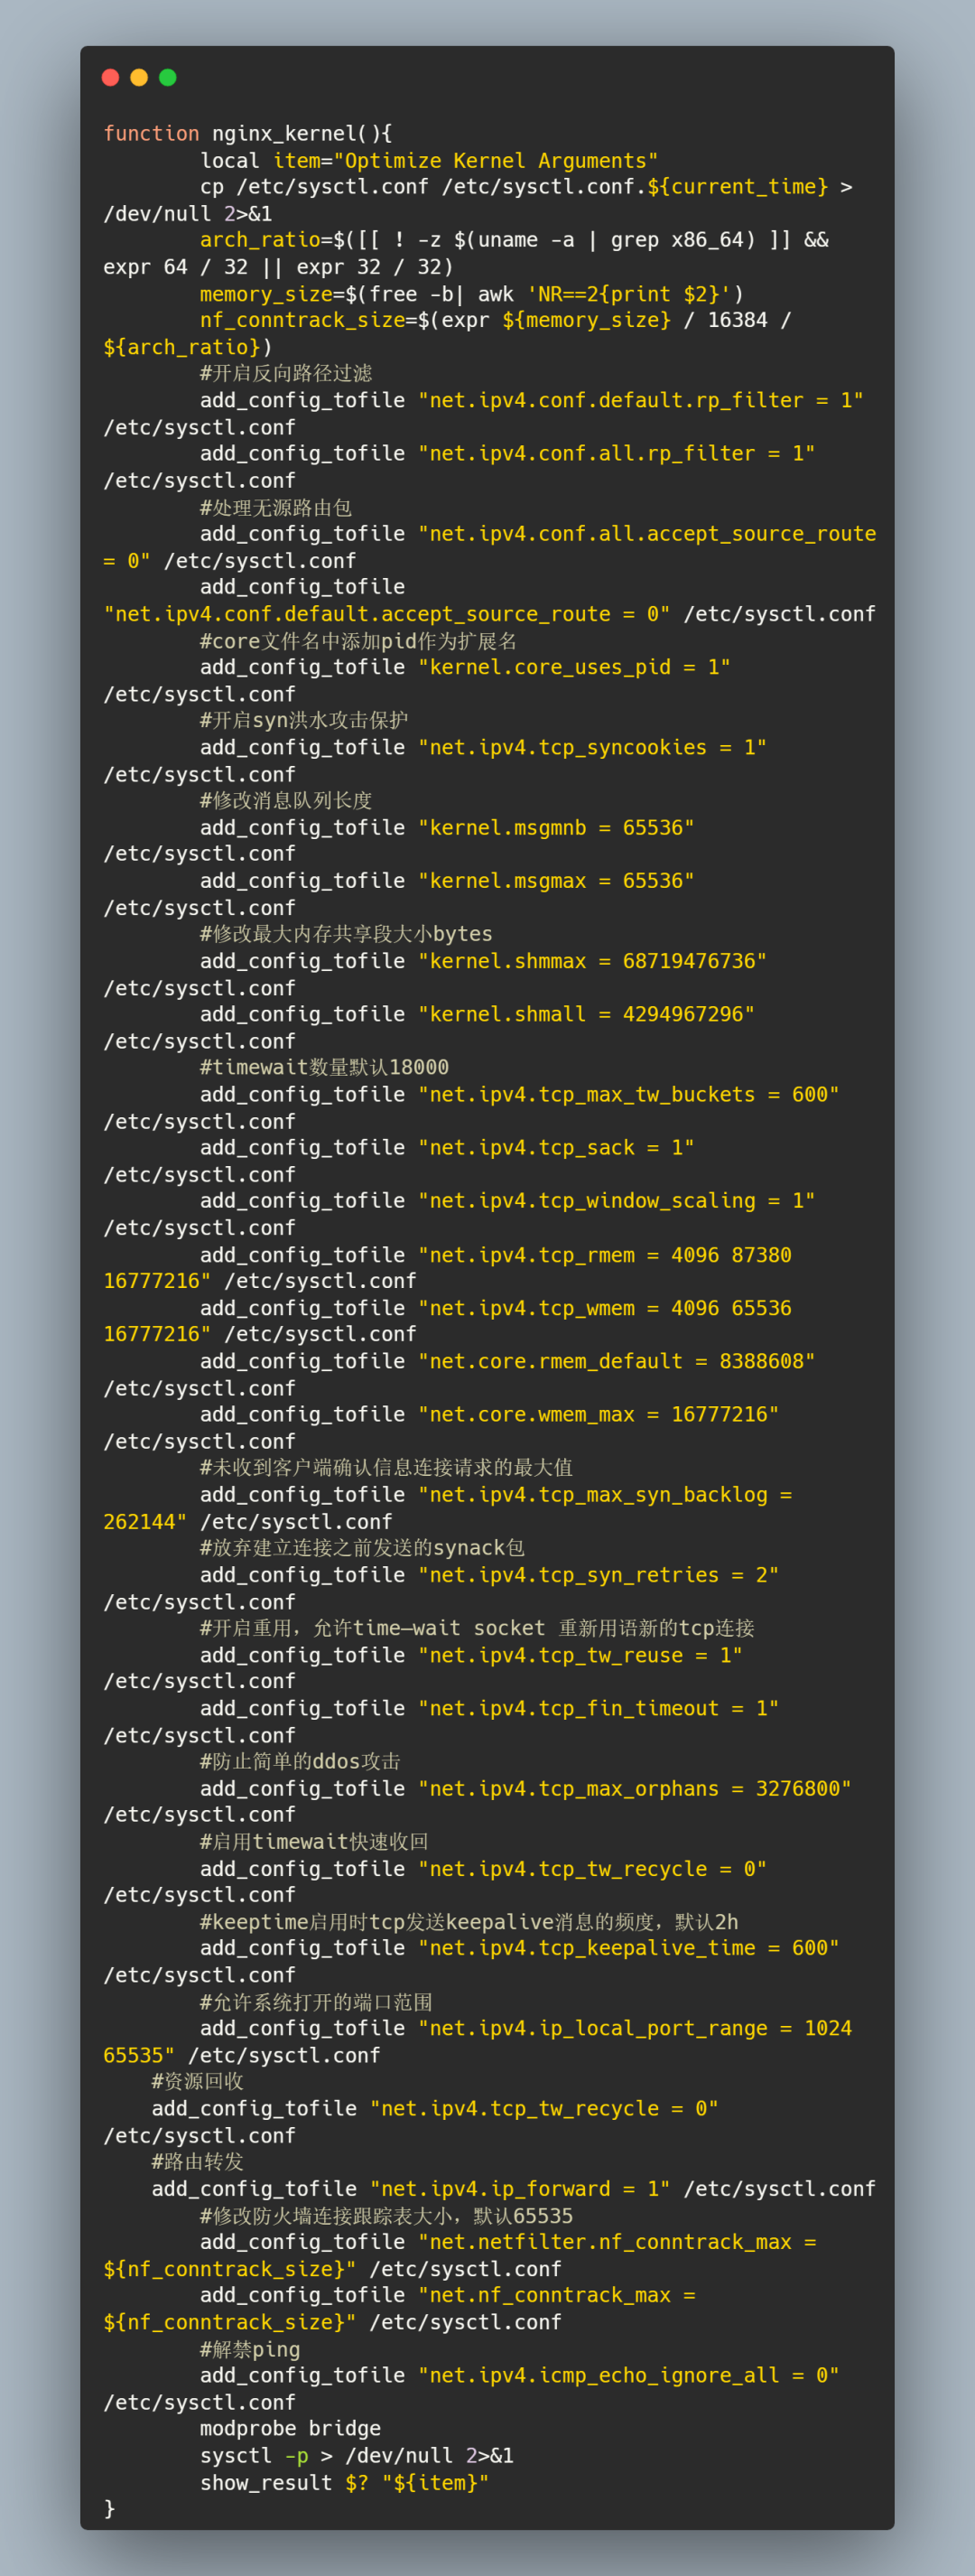
内核参数优化
-
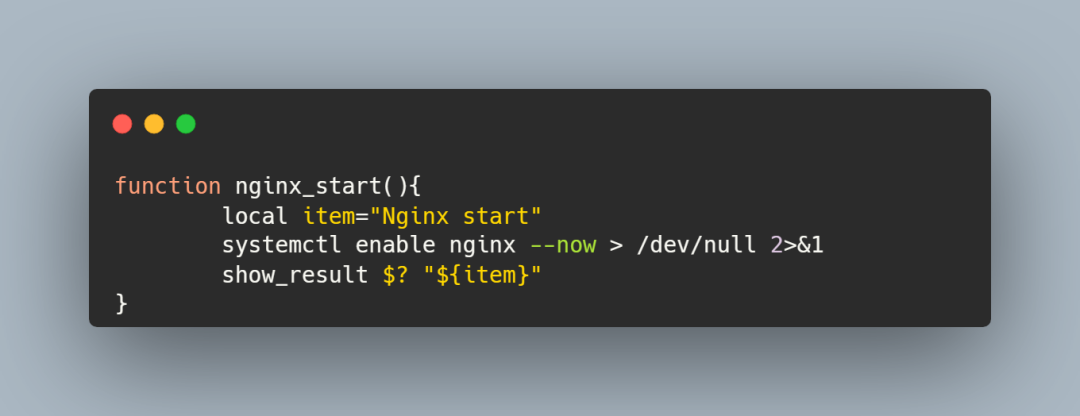
启动 nginx 并设置开机自启动
-
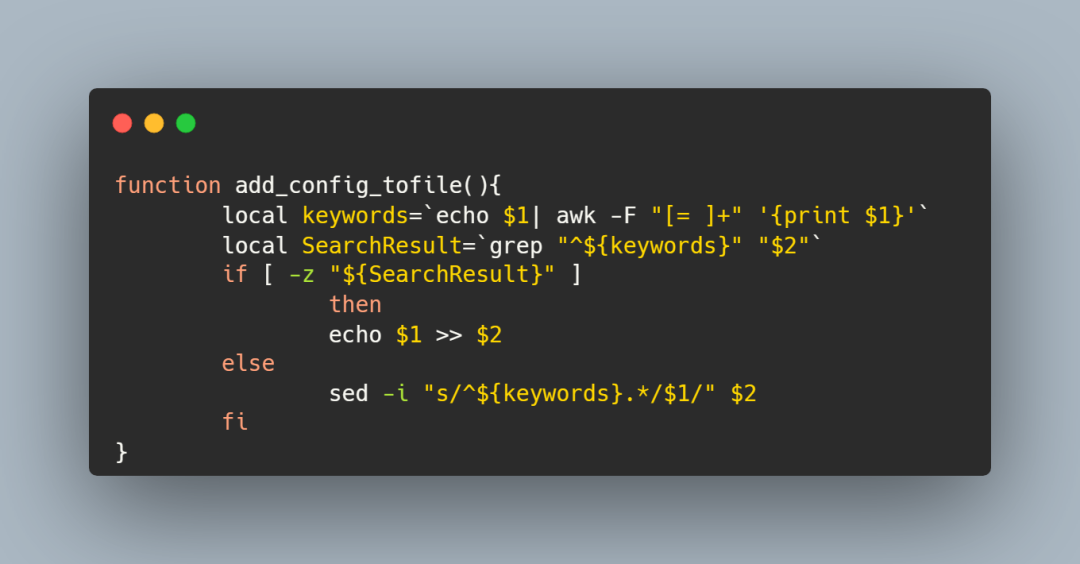
负责配置写入的函数
在上面的内核参数优化函数里面,我并没有使用 echo 将配置直接重定向到 /etc/sysctl.conf 文件里面
而是用了 add_config_tofile 函数,第一个参数是配置项,第二个参数是文件名
-
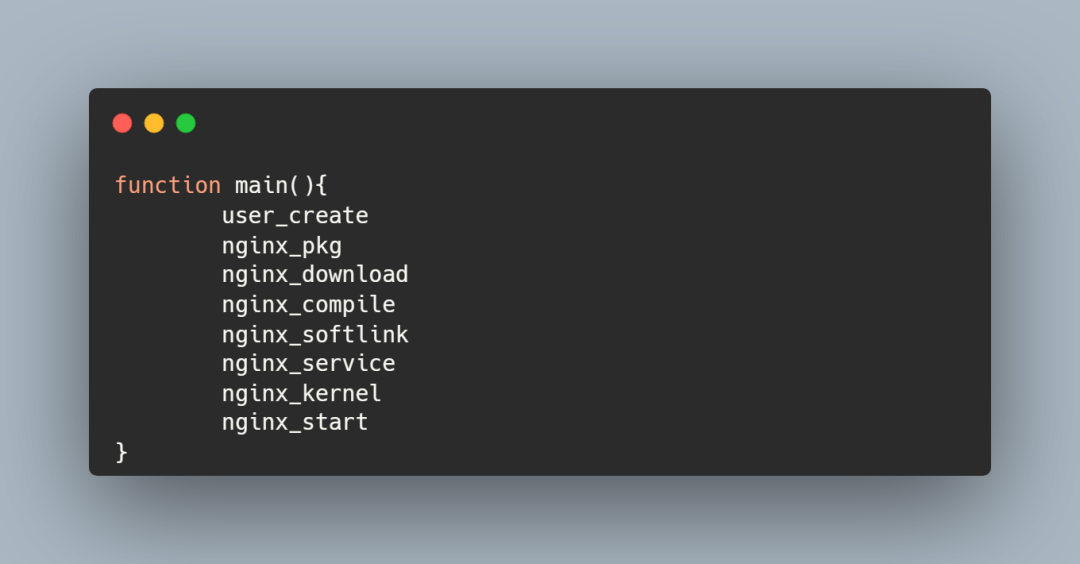
main 函数
-
完整代码
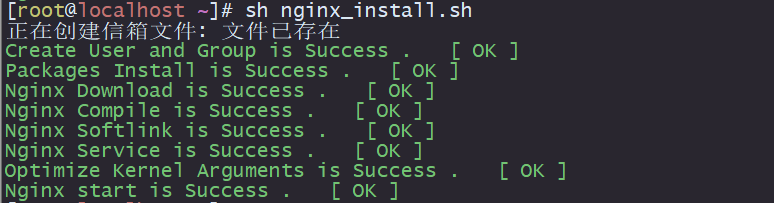
执行结果如下:
#! /bin/bash

version=1.15.4

#判断函数是否执行成功
function show_result(){
  if [ "$1" -eq 0 ]
    then
      echo -e "\e[32m$2 is Success .   [ OK ] \e[0m"
    else
      echo -e "\e[31m$2 is Fail .   [ FAIL ] \e[0m"
  fi
}

#创建 nginx 用户和用户组
function user_create(){
        local item="Create User and Group"
        if [ `cat /etc/{passwd,group} | grep nginx | wc -l ` -ge 2  ];
        then
                echo -e "\e[31mUser and Group exist! \e[0m"
    else
        groupadd -g 1004 nginx && \
        useradd -u 1004 -g 1004 -M  -s /sbin/nologin nginx
        show_result $? "${item}"
    fi
}

#下载一些拓展包
function nginx_pkg(){
        local item="Packages Install"
        yum -y install gcc openssl-devel pcre-devel zlib-devel > /dev/null 2>&1
        show_result $? "${item}"
}


#下载nginx
function nginx_download(){
        local item="Nginx Download"
        cd /usr/local/src && \
        wget http://nginx.org/download/nginx-${version}.tar.gz > /dev/null 2>&1
        test -e /usr/local/src/nginx-${version} || tar zxf nginx-${version}.tar.gz
        rm -rf /usr/local/src/nginx-${version}.tar.gz
        show_result $? "${item}"
}


#编译安装
function nginx_compile(){
        local item="Nginx Compile"
        cd /usr/local/src/nginx-${version}
        if [ `ls -l  /usr/local/ | grep 'nginx' | wc -l` -ge 1  ];
        then
                echo -e "\e[31mNginx exist! \e[0m"
        else
                ./configure --prefix=/usr/local/nginx > /dev/null 2>&1 && make > /dev/null 2>&1 && make install > /dev/null 2>&1
        fi
        show_result $? "${item}"
}

#软连接建立
function nginx_softlink(){
        local item="Nginx Softlink"
        test -d /etc/nginx/ || ln -s /usr/local/nginx/conf/ /etc/nginx
        test -e /usr/sbin/nginx || ln -s /usr/local/nginx/sbin/nginx /usr/sbin/
        show_result $? "${item}"
}


#注册服务
function nginx_service(){
        local item="Nginx Service"
        test -e /usr/lib/systemd/system/nginx.service || \
        echo '
[Unit]
Description=The nginx HTTP and reverse proxy server
After=network-online.target remote-fs.target nss-lookup.target
Wants=network-online.target
[Service]
Type=forking
PIDFile=/usr/local/nginx/logs/nginx.pid
# Nginx will fail to start if /run/nginx.pid already exists but has the wrong
# SELinux context. This might happen when running `nginx -t` from the cmdline.
# https://bugzilla.redhat.com/show_bug.cgi?id=1268621ExecStartPre=/usr/bin/rm-f /usr/local/nginx/logs/nginx.pid
ExecStartPre=/usr/local/nginx/sbin/nginx -t
ExecStart=/usr/local/nginx/sbin/nginx
ExecReload=/usr/local/nginx/sbin/nginx -s reload
KillSignal=SIGQUIT
TimeoutStopSec=5
KillMode=process
PrivateTmp=true
        ' > /usr/lib/systemd/system/nginx.service
        systemctl daemon-reload
        show_result $? "${item}"
}


#内核优化
function nginx_kernel(){
        local item="Optimize Kernel Arguments"
        cp /etc/sysctl.conf /etc/sysctl.conf.${current_time} > /dev/null 2>&1
        arch_ratio=$([[ ! -z $(uname -a | grep x86_64) ]] && expr 64 / 32 || expr 32 / 32)
        memory_size=$(free -b| awk 'NR==2{print $2}')
        nf_conntrack_size=$(expr ${memory_size} / 16384 / ${arch_ratio})
        #开启反向路径过滤
        add_config_tofile "net.ipv4.conf.default.rp_filter = 1" /etc/sysctl.conf
        add_config_tofile "net.ipv4.conf.all.rp_filter = 1" /etc/sysctl.conf
        #处理无源路由包
        add_config_tofile "net.ipv4.conf.all.accept_source_route = 0" /etc/sysctl.conf
        add_config_tofile "net.ipv4.conf.default.accept_source_route = 0" /etc/sysctl.conf
        #core文件名中添加pid作为扩展名
        add_config_tofile "kernel.core_uses_pid = 1" /etc/sysctl.conf
        #开启syn洪水攻击保护
        add_config_tofile "net.ipv4.tcp_syncookies = 1" /etc/sysctl.conf
        #修改消息队列长度
        add_config_tofile "kernel.msgmnb = 65536" /etc/sysctl.conf
        add_config_tofile "kernel.msgmax = 65536" /etc/sysctl.conf
        #修改最大内存共享段大小bytes
        add_config_tofile "kernel.shmmax = 68719476736" /etc/sysctl.conf
        add_config_tofile "kernel.shmall = 4294967296" /etc/sysctl.conf
        #timewait数量默认18000
        add_config_tofile "net.ipv4.tcp_max_tw_buckets = 600" /etc/sysctl.conf
        add_config_tofile "net.ipv4.tcp_sack = 1" /etc/sysctl.conf
        add_config_tofile "net.ipv4.tcp_window_scaling = 1" /etc/sysctl.conf
        add_config_tofile "net.ipv4.tcp_rmem = 4096 87380 16777216" /etc/sysctl.conf
        add_config_tofile "net.ipv4.tcp_wmem = 4096 65536 16777216" /etc/sysctl.conf
        add_config_tofile "net.core.rmem_default = 8388608" /etc/sysctl.conf
        add_config_tofile "net.core.wmem_max = 16777216" /etc/sysctl.conf
        #未收到客户端确认信息连接请求的最大值
        add_config_tofile "net.ipv4.tcp_max_syn_backlog = 262144" /etc/sysctl.conf
        #放弃建立连接之前发送的synack包
        add_config_tofile "net.ipv4.tcp_syn_retries = 2" /etc/sysctl.conf
        #开启重用,允许time—wait socket 重新用语新的tcp连接
        add_config_tofile "net.ipv4.tcp_tw_reuse = 1" /etc/sysctl.conf
        add_config_tofile "net.ipv4.tcp_fin_timeout = 1" /etc/sysctl.conf
        #防止简单的ddos攻击
        add_config_tofile "net.ipv4.tcp_max_orphans = 3276800" /etc/sysctl.conf
        #启用timewait快速收回
        add_config_tofile "net.ipv4.tcp_tw_recycle = 0" /etc/sysctl.conf
        #keeptime启用时tcp发送keepalive消息的频度,默认2h
        add_config_tofile "net.ipv4.tcp_keepalive_time = 600" /etc/sysctl.conf
        #允许系统打开的端口范围
        add_config_tofile "net.ipv4.ip_local_port_range = 1024 65535" /etc/sysctl.conf
    #资源回收
    add_config_tofile "net.ipv4.tcp_tw_recycle = 0" /etc/sysctl.conf
    #路由转发
    add_config_tofile "net.ipv4.ip_forward = 1" /etc/sysctl.conf
        #修改防火墙连接跟踪表大小,默认65535
        add_config_tofile "net.netfilter.nf_conntrack_max = ${nf_conntrack_size}" /etc/sysctl.conf
        add_config_tofile "net.nf_conntrack_max = ${nf_conntrack_size}" /etc/sysctl.conf
        #解禁ping
        add_config_tofile "net.ipv4.icmp_echo_ignore_all = 0" /etc/sysctl.conf
        modprobe bridge
        sysctl -p > /dev/null 2>&1
        show_result $? "${item}"
}


#启动 nginx
function nginx_start(){
        local item="Nginx start"
        systemctl enable nginx --now > /dev/null 2>&1
        show_result $? "${item}"
}


#负责写入配置的函数
function add_config_tofile(){
        local keywords=`echo $1| awk -F "[= ]+" '{print $1}'`
        local SearchResult=`grep "^${keywords}" "$2"`
        if [ -z "${SearchResult}" ]
                then
                echo $1 >> $2
        else
                sed -i "s/^${keywords}.*/$1/" $2
        fi
}
#主函数
function main(){
        user_create
        nginx_pkg
        nginx_download
        nginx_compile
        nginx_softlink
        nginx_service
        nginx_kernel
        nginx_start
}

main

原文链接:https://www.cnblogs.com/edisonfish/p/17278111.html
本站文章如无特殊说明,均为本站原创,如若转载,请注明出处:shell 脚本之一键部署安装 Nginx - Python技术站
 微信扫一扫
微信扫一扫  支付宝扫一扫