1、
1.1 opencv static linux
mkdir build & cd build
cmake .. -LH 这句话用来查看编译选项 如果不知道编译啥 可以用这个查看一下~
cmake
-D CMAKE_INSTALL_PREFIX=/work/lib/opencv/ubuntu14/2.4.13
-D BUILD_SHARED_LIBS=OFF
-D WITH_CUDA=OFF
-D WITH_OPENCL=OFF
-D BUILD_PERF_TESTS=OFF
-D BUILD_TESTS=OFF
-D BUILD_opencv_world=ON
-D WITH_FFMPEG:BOOL=OFF
-D BUILD_opencv_videoio=OFF
-D BUILD_JPEG=ON
-D BUILD_PNG=ON
..
如果遇到ipp 下载出错被Qiang, 则需要手动下载然后配置, 下载地址在cmake 的log 中可以找到
配置位置: opencv/3rdparty/ippicv文件夹下的 ippicv.cmake中,第47行
修改为 "file:///home/ubuntu/Downloads/"
注: 如果要加入contrib , 则需要加入如下选项:
-D OPENCV_EXTRA_MODULES_PATH="../../contrib/modules" 即
如果要加入libpng libjpeg
-D BUILD_JPEG=ON -D BUILD_PNG=ON
若需要编译dnn 则需要cmake版本3.5.1 以上, 这里是cmake 3.6.0 下载链接
https://download.csdn.net/download/u011258240/11122952
可能出现的错误:
  1.In-source builds are not allowed   :  删掉CMakeCache.txt  然后重新编译
  2. ipp 下载失败    打开buildCMakeDownloadLog.txt   就可以看到下载链接了   下载下来即可
  1.2. opencv + win10
  取消勾选 JAVA python cuda test , 添加 install 安装目录 ,  configure  , generate

3.4的依赖
Libs: -L${exec_prefix}/lib/x86_64-linux-gnu
-lopencv_dnn -lopencv_ml -lopencv_objdetect -lopencv_shape -lopencv_stitching -lopencv_superres -lopencv_videostab -lopencv_calib3d -lopencv_features2d -lopencv_highgui -lopencv_videoio -lopencv_imgcodecs -lopencv_video -lopencv_photo -lopencv_imgproc -lopencv_flann -lopencv_core
-L${exec_prefix}/share/OpenCV/3rdparty/lib/x86_64-linux-gnu
-littnotify -llibprotobuf -lzlib -llibjpeg -llibwebp -llibpng -llibtiff -llibjasper -lIlmImf -lippiw -lippicv -ldl -lm -lpthread -lrt -lz
2. caffe
编译机器
1. 安装依赖
sudo apt-get install libprotobuf-dev libleveldb-dev libsnappy-dev libopencv-dev libboost-all-dev libhdf5-serial-dev libgflags-dev libgoogle-glog-dev liblmdb-dev protobuf-compiler libatlas-base-dev cmake python-pip
2. 安装 numpy
pip install numpy
3 安装caffe动态库
下载caffe源码
wget https://github.com/BVLC/caffe/archive/1.0.tar.gz
cd caffe-1.0.0
cp Makefile.config.example Makefile.config
更改Makefile.config
第八行 CPU_ONLY := 1 打开,表示只使用CPU,如果你用GPU 这一步就不用做了。
修改 cmake/Dependencies.cmake
最顶部加入:
set(CMAKE_PREFIX_PATH ${CMAKE_PREFIX_PATH} "/work/lib/opencv/3.3")
find_package(OpenCV 3.3.0 REQUIRED)
mkdir build
cd build
cmake ../ -DBUILD_SHARED_LIBS=1 -DCMAKE_INSTALL_PREFIX=install
#### cmake . -DBUILD_SHARED_LIBS=1 -DCMAKE_INSTALL_PREFIX=install
【可选项】修改caffe 源码,使其不要在控制台打印一大堆东西, 将src/caffe/common.cpp GlobalInit 源码替换为如下
void GlobalInit(int* pargc, char*** pargv) {
{
  // Google flags.
  ::gflags::ParseCommandLineFlags(pargc, pargv, true);
  ::google::InitGoogleLogging(*(pargv)[0]);
  google::SetLogDestination(google::WARNING,"");
}
make
make install
cd MTCNN_Caffe
cmake .
make
运行机器:
apt-get install libgoogle-glog-dev libopencv-dev
3. CUDA
3.1cuda sdk
https://developer.nvidia.com/cuda-toolkit-archive
-
- `sudo dpkg -i cuda-repo-ubuntu1404-10-0-local-10.0.130-410.48_1.0-1_amd64.deb`
- `sudo apt-key add /var/cuda-repo-<version>/7fa2af80.pub`
- `sudo apt-get update`
- `sudo apt-get install cuda`
其中 Windows版本 VS需要配置 : C:Program FilesNVIDIA GPU Computing ToolkitCUDAv10.1extrasvisual_studio_integrationMSBuildExtensions 复制到
$(你的路径)MSBuildMicrosoftVCv160BuildCustomizations
3.2 驱动下载
https://www.nvidia.cn/Download/Find.aspx?lang=cn
nvidia-smi #查看当前驱动
ubuntu-drivers devices #查看系统建议安装的驱动
apt-get isntall nvidia-430 #安装驱动
可能出现的安装错误: ERROR: Installation has failed. Please see the file ‘/var/log/nvidia-installer.log’ for details. You may find suggestions on fixing installation problems in t
解决方法: https://forums.developer.nvidia.com/t/installing-driver-fails-for-tesla-v100/83983
3.3cuDNN 依赖安装
https://developer.nvidia.com/rdp/cudnn-archive
安装cudnn 的时候下载 cudnn library , 不要下载runtime lib 和 dev lib
cuda 和cudnn 的删除 https://blog.csdn.net/wanzhen4330/article/details/81704474
3.4 不同版本cuda切换
ln -sf cuda-8.0/ cuda
3.5 不同cudnn版本切换 :
ln -sf /usr/lib/x86_64-linux-gnu/libcudnn.so.7 /etc/alternatives/libcudnn_so
ln -sf /usr/include/x86_64-linux-gnu/cudnn_v7.h /etc/alternatives/libcudnn
3.6 nsight 下载地址
https://developer.nvidia.com/gameworksdownload#?tx=$gameworks,developer_tools
4. ubuntu14安装tensorflow
#####cd tensorflow-1.13.1
pip install tensorflow
pip install tensorflow-gpu
5 RetinaNet 环境搭建
git clone https://github.com/fizyr/keras-retinanet.git
cd keras-retinanet
pip install numpy --user
pip install . --user
pip install --upgrade Pillow
训练:
####keras_retinanet/bin/train.py pascal /root/darknet/VOCdevkit/VOC2007/
retinanet-train pascal /path/to/VOCdevkit/VOC2007
可能出现的错误:
1. Getting error: unknown file type '.pyx' when installing from source #13
解决办法:
sudo apt-get remove python-setuptools
wget https://bootstrap.pypa.io/get-pip.py
sudo -H pip install -U pip setuptools
2. ImportError: libcublas.so.10.0: cannot open shared object file: No such file or directory
解决办法: 安装CUDA 10.0
6. 搭建Tensorflow1.13 C++ 开发环境
6.1 linux
https://blog.csdn.net/gubenpeiyuan/article/details/80855644
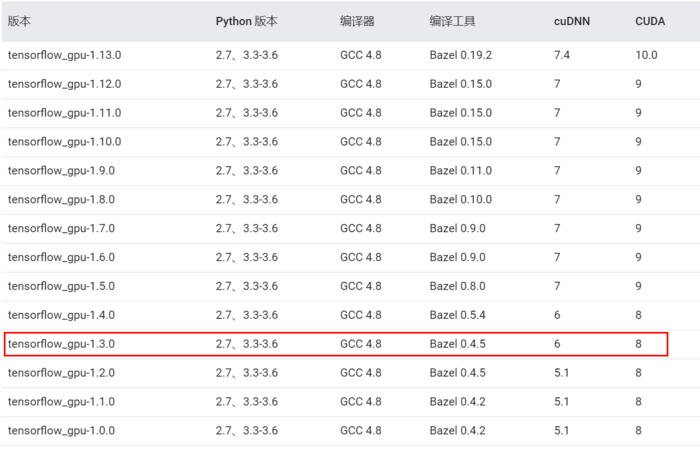
版本需要按照以下来搭配 , 不然会出问题
https://www.tensorflow.org/install/source

192.168.1.208 tensorflow = 1.13.1
下载Tensorflow1.3.0 下载 bazel-0.4.5 cudnn6
tar -zxvf v1.3.0.tar.gz
./bazel-0.4.5-installer-linux-x86_64.sh
cd tensorflow*
bazel build --config=opt --config=cuda //tensorflow:libtensorflow_cc.so
可能出现的错误和解决方案:
bug: 'protobuf.bzl': no such package ... ...
fix: sed -i '@https://github.com/google/protobuf/archive/0b059a3d8a8f8aa40dde7bea55edca4ec5dfea66.tar.gz@d' tensorflow/workspace.bzl
see it : https://github.com/tensorflow/tensorflow/issues/12979
使用Docker 编译 (refer url: https://www.tensorflow.org/install/source?hl=zh-cn)
Docker 是为 TensorFlow 构建 GPU 支持的最简单方法,因为主机只需安装 NVIDIA® 驱动程序,而不必安装 NVIDIA® CUDA® 工具包。如需设置 nvidia-docker,请参阅 GPU 支持指南和 TensorFlow Docker 指南(仅限 Linux)。
以下示例会下载 TensorFlow :devel-gpu-py3 映像并使用 nvidia-docker 运行支持 GPU 的容器。此开发映像已配置为构建支持 GPU 的 Python 3 pip 软件包:
docker pull tensorflow/tensorflow:devel-gpu-py3
nvidia-docker run -it  -w /tensorflow -v $PWD:/mnt -e HOST_PERMS="$(id -u):$(id -g)"
    tensorflow/tensorflow:devel-gpu-py3 bash
git pull  # within the container, download the latest source code
注意: 如果docker 不小于19.03 需要使用 ... docker run --gpus all -it 命令
然后,在该容器的虚拟环境中,构建支持 GPU 的 TensorFlow 软件包:
./configure  # answer prompts or use defaults

#####bazel build --config=opt --config=cuda //tensorflow/tools/pip_package:build_pip_package
bazel build --config=opt --config=cuda //tensorflow:libtensorflow_cc.so
./bazel-bin/tensorflow/tools/pip_package/build_pip_package /mnt  # create package

chown $HOST_PERMS /mnt/tensorflow-version-tags.whl
注意:1.如果提示bazel版本不匹配,去git下载一个编译好的版本
2. configure 的编译选项的含义参考 https://blog.csdn.net/yhily2008/article/details/79967118
在该容器中安装和验证软件包并检查是否有 GPU:
pip uninstall tensorflow  # remove current version

pip install /mnt/tensorflow-version-tags.whl
cd /tmp  # don't import from source directory
python -c "import tensorflow as tf; print(tf.contrib.eager.num_gpus())"
6.2 Windows 安装: (放弃了)
1) download swig exe : http://www.swig.org/
编译成静态库:
http://www.luohanjie.com/2019-07-17/build-tensorflow-c-static-libraries.html
7. bazel 编译 transform_graph (下载最新版的bazel 和 tensorflow)
bazel build tensorflow/tools/graph_transforms:transform_graph
8 交叉编译opencv
http://bbs.ebaina.com/forum.php?mod=viewthread&tid=38496&highlight=opencv
vi cmake/OpenCVCompilerOptions.cmake
最末尾添加:
if(ENABLE_NEON)
    add_extra_compiler_option("-mcpu=cortex-a7 -mfpu=neon")
endif()
vi CMakeList.txt
将NEON那行改为:
OCV_OPTION(ENABLE_NEON "Enable NEON instructions" ON )
cmake
-D CMAKE_INSTALL_PREFIX=/work/lib/opencv/arm-hisi/2.4.13
-D BUILD_SHARED_LIBS=ON
-D WITH_CUDA=OFF
-D WITH_OPENCL=OFF
-D BUILD_PERF_TESTS=OFF
-D BUILD_TESTS=OFF
-D BUILD_opencv_world=OFF
-D WITH_FFMPEG:BOOL=OFF
-D BUILD_opencv_videoio=OFF
-D BUILD_JPEG=ON
-D BUILD_PNG=ON
-DCMAKE_TOOLCHAIN_FILE=../platforms/linux/arm-gnueabi.toolchain.cmake
-DCMAKE_CXX_COMPILER=/opt/hisi-linux/x86-arm/arm-hisiv400-linux/bin/arm-hisiv400-linux-gnueabi-g++
-DCMAKE_C_COMPILER=/opt/hisi-linux/x86-arm/arm-hisiv400-linux/bin/arm-hisiv400-linux-gnueabi-gcc
-DCMAKE_AR=/opt/hisi-linux/x86-arm/arm-hisiv400-linux/bin/arm-hisiv400-linux-gnueabi-ar
-DCMAKE_LINKER=/opt/hisi-linux/x86-arm/arm-hisiv400-linux/bin/arm-hisiv400-linux-gnueabi-ld
-DCMAKE_NM=/opt/hisi-linux/x86-arm/arm-hisiv400-linux/bin/arm-hisiv400-linux-gnueabi-nm
-DCMAKE_OBJCOPY=/opt/hisi-linux/x86-arm/arm-hisiv400-linux/bin/arm-hisiv400-linux-gnueabi-objcopy
-DCMAKE_OBJDUMP=/opt/hisi-linux/x86-arm/arm-hisiv400-linux/bin/arm-hisiv400-linux-gnueabi-objdump
-DCMAKE_STRIP=/opt/hisi-linux/x86-arm/arm-hisiv400-linux/bin/arm-hisiv400-linux-gnueabi-strip
..
9 openFrameWorks
https://openframeworks.cc/download/older/
安装0.90
10 VS2012 下载地址
http://download.microsoft.com/download/B/0/F/B0F589ED-F1B7-478C-849A-02C8395D0995/VS2012_ULT_chs.iso
产品密钥
-
YKCW6-BPFPF-BT8C9-7DCTH-QXGWC
-
RBCXF-CVBGR-382MK-DFHJ4-C69G8
-
YQ7PR-QTHDM-HCBCV-9GKGG-TB2TM
-
YKCW6-BPFPF-BT8C9-7DCTH-QXGWC
11 glfw-3 安装
isntall libglfw3
https://launchpad.net/ubuntu/xenial/amd64/libglfw3/3.1.2-3
install libglfw3-dev
https://launchpad.net/ubuntu/yakkety/amd64/libglfw3-dev/3.1.2-3
12 VS 旧版本 https://visualstudio.microsoft.com/zh-hans/vs/older-downloads/
13 docker 安装 pytorch
https://medium.com/@zaher88abd/pytorch-with-docker-b791edd67850
14 docker 查看镜像版本
去网站 https://hub.docker.com/ 搜索镜像, 点开星星最多的镜像, 在tags 里面搜索符合的镜像 , 然后pull
docker pull tensorflow/tensorflow:1.15.2-gpu
15 安装Nvidia-docker
添加源
curl -s -L https://nvidia.github.io/nvidia-docker/gpgkey |
  sudo apt-key add -
distribution=$(. /etc/os-release;echo $ID$VERSION_ID)
curl -s -L https://nvidia.github.io/nvidia-docker/$distribution/nvidia-docker.list |
  sudo tee /etc/apt/sources.list.d/nvidia-docker.list
sudo apt-get update
安装
sudo apt install nvidia-container-toolkit
systemctl restart docker
16 intel ipp 下载地址
https://dynamicinstaller.intel.com/system-studio/
https://dynamicinstaller.intel.com/download
17 webpp
https://storage.googleapis.com/downloads.webmproject.org/releases/webp/index.html
18 libtorch 安装
https://pytorch.org/
19 cudnn 安装
https://developer.nvidia.com/rdp/cudnn-download
本站文章如无特殊说明,均为本站原创,如若转载,请注明出处:安装笔记, caffe 、 opencv等 - Python技术站


 微信扫一扫
微信扫一扫  支付宝扫一扫


