RNN 模型作为一个可以学习时间序列的模型被认为是深度学习中比较重要的一类模型。在Tensorflow的官方教程中,有两个与之相关的模型被实现出来。第一个模型是围绕着Zaremba的论文Recurrent Neural Network Regularization,以Tensorflow框架为载体进行的实验再现工作。第二个模型则是较为实用的英语法语翻译器。在这篇博客里,我会主要针对第一个模型的代码进行解析。在之后的随笔里我会进而解析英语法语翻译器的机能。
论文以及Tensorflow官方教程介绍:
Zaremba设计了一款带有regularization机制的RNN模型。该模型是基于RNN模型的一个变种,叫做LSTM。论文中,框架被运用在语言模型,语音识别,机器翻译以及图片概括等应用的建设上来验证架构的优越性。作为Tensorflow的官方demo,该模型仅仅被运用在了语言模型的建设上来试图重现论文中的数据。官方已经对他们的模型制作了一部教程,点击这里查看官方教程(英语版)。
代码解析:
代码可以在github找到,这里先放上代码地址。点击这里查看代码。
代码框架很容易理解,一开始,PTB模型被设计入了一个类。该类的init函数为多层LSTM语言模型的架构,代码如下:
def __init__(self, is_training, config):
    self.batch_size = batch_size = config.batch_size
    self.num_steps = num_steps = config.num_steps
    size = config.hidden_size
    vocab_size = config.vocab_size

    #这里是定义输入tensor的placeholder,我们可见这里有两个输入,
    # 一个是数据,一个是目标
    self._input_data = tf.placeholder(tf.int32, [batch_size, num_steps])
    self._targets = tf.placeholder(tf.int32, [batch_size, num_steps])

    # Slightly better results can be obtained with forget gate biases
    # initialized to 1 but the hyperparameters of the model would need to be
    # different than reported in the paper.
    # 这里首先定义了一单个lstm的cell,这个cell有五个parameter,依次是
    # number of units in the lstm cell, forget gate bias, 一个已经deprecated的
    # parameter input_size, state_is_tuple=False, 以及activation=tanh.这里我们
    # 仅仅用了两个parameter,即size,也就是隐匿层的单元数量以及设forget gate
    # 的bias为0. 上面那段英文注视其实是说如果把这个bias设为1效果更好,虽然
    # 会制造出不同于原论文的结果。
    lstm_cell = tf.nn.rnn_cell.BasicLSTMCell(size, forget_bias=0.0)
    if is_training and config.keep_prob < 1: # 在训练以及为输出的保留几率小于1时
      # 这里这个dropoutwrapper其实是为每一个lstm cell的输入以及输出加入了dropout机制
      lstm_cell = tf.nn.rnn_cell.DropoutWrapper(
          lstm_cell, output_keep_prob=config.keep_prob)
    # 这里的cell其实就是一个多层的结构了。它把每一曾的lstm cell连在了一起得到多层
    # 的RNN
    cell = tf.nn.rnn_cell.MultiRNNCell([lstm_cell] * config.num_layers)
    # 根据论文地4页章节4.1,隐匿层的初始值是设为0
    self._initial_state = cell.zero_state(batch_size, tf.float32)

    with tf.device("/cpu:0"):
      # 设定embedding变量以及转化输入单词为embedding里的词向量(embedding_lookup函数)
      embedding = tf.get_variable("embedding", [vocab_size, size])
      inputs = tf.nn.embedding_lookup(embedding, self._input_data)

    if is_training and config.keep_prob < 1:
      # 对输入进行dropout
      inputs = tf.nn.dropout(inputs, config.keep_prob)

    # Simplified version of tensorflow.models.rnn.rnn.py's rnn().
    # This builds an unrolled LSTM for tutorial purposes only.
    # In general, use the rnn() or state_saving_rnn() from rnn.py.
    #
    # The alternative version of the code below is:
    #
    # from tensorflow.models.rnn import rnn
    # inputs = [tf.squeeze(input_, [1])
    #           for input_ in tf.split(1, num_steps, inputs)]
    # outputs, state = rnn.rnn(cell, inputs, initial_state=self._initial_state)

    outputs = []
    state = self._initial_state
    with tf.variable_scope("RNN"):
      for time_step in range(num_steps):
        if time_step > 0: tf.get_variable_scope().reuse_variables()
        # 从state开始运行RNN架构,输出为cell的输出以及新的state.
        (cell_output, state) = cell(inputs[:, time_step, :], state)
        outputs.append(cell_output)

    # 输出定义为cell的输出乘以softmax weight w后加上softmax bias b. 这被叫做logit
    output = tf.reshape(tf.concat(1, outputs), [-1, size])
    softmax_w = tf.get_variable("softmax_w", [size, vocab_size])
    softmax_b = tf.get_variable("softmax_b", [vocab_size])
    logits = tf.matmul(output, softmax_w) + softmax_b
    # loss函数是average negative log probability, 这里我们有现成的函数sequence_loss_by_example
    # 来达到这个效果。
    loss = tf.nn.seq2seq.sequence_loss_by_example(
        [logits],
        [tf.reshape(self._targets, [-1])],
        [tf.ones([batch_size * num_steps])])
    self._cost = cost = tf.reduce_sum(loss) / batch_size
    self._final_state = state

    if not is_training:
      return
    # learning rate
    self._lr = tf.Variable(0.0, trainable=False)
    tvars = tf.trainable_variables()
    # 根据张量间的和的norm来clip多个张量
    grads, _ = tf.clip_by_global_norm(tf.gradients(cost, tvars),
                                      config.max_grad_norm)
    # 用之前的变量learning rate来起始梯度下降优化器。
    optimizer = tf.train.GradientDescentOptimizer(self.lr)
    # 一般的minimize为先取compute_gradient,再用apply_gradient
    # 这里我们不需要compute gradient, 所以直接等于叫了minimize函数的后半段。
    self._train_op = optimizer.apply_gradients(zip(grads, tvars))##
上面的代码注释已就框架进行了解释。但我有意的留下了一个最为关键的部分没有解释,即variable_scope以及reuse_variable函数。该类函数有什么特殊意义呢?我们这里先卖个关子,下面的内容会就这个问题深入探究。
模型建立好后该类还有其他如assign_lr(self,session,lr_value)以及property函数如input_data(self). 这些函数浅显易懂,就不在这里解释了。
之后,官方代码设计了小模型(原论文中没有regularized的模型)外,还原了论文里的中等模型以及大模型。这些模型是基于同样的框架,不过不同在迭代数,神经元数以及dropout概率等地方。另有由于小模型的keep_prob概率被设计为1,将不会运用dropout。
另外,由于系统的运行是在terminal里输入”python 文件名 --参数 参数值“格式,名为get_config()的函数的意义在于把用户输入,如small,换算成运用SmallConfig()类。
最后,我们来看一看main函数以及run_epoch函数。首先来看下run_epoch:
def run_epoch(session, m, data, eval_op, verbose=False):
  """Runs the model on the given data."""
  epoch_size = ((len(data) // m.batch_size) - 1) // m.num_steps
  start_time = time.time()
  costs = 0.0
  iters = 0
  state = m.initial_state.eval()
  # ptb_iterator函数在接受了输入,batch size以及运行的step数后输出
  # 步骤数以及每一步骤所对应的一对x和y的batch数据,大小为[batch_size, num_step]
  for step, (x, y) in enumerate(reader.ptb_iterator(data, m.batch_size,
                                                    m.num_steps)):
    # 在函数传递入的session里运行rnn图的cost和 fina_state结果,另外也计算eval_op的结果
    # 这里eval_op是作为该函数的输入。
    cost, state, _ = session.run([m.cost, m.final_state, eval_op],
                                 {m.input_data: x,
                                  m.targets: y,
                                  m.initial_state: state})
    costs += cost
    iters += m.num_steps
    # 每一定量运行后输出目前结果
    if verbose and step % (epoch_size // 10) == 10:
      print("%.3f perplexity: %.3f speed: %.0f wps" %
            (step * 1.0 / epoch_size, np.exp(costs / iters),
             iters * m.batch_size / (time.time() - start_time)))

  return np.exp(costs / iters)
该函数很正常,逻辑也比较清晰,容易理解。现在,让我们重点看看我们的main函数:
def main(_):
  # 需要首先确认输入数据的path,不然没法训练模型
  if not FLAGS.data_path:
    raise ValueError("Must set --data_path to PTB data directory")
  # 读取输入数据并将他们拆分开
  raw_data = reader.ptb_raw_data(FLAGS.data_path)
  train_data, valid_data, test_data, _ = raw_data
  # 读取用户输入的config,这里用具决定了是小,中还是大模型
  config = get_config()
  eval_config = get_config()
  eval_config.batch_size = 1
  eval_config.num_steps = 1
  # 建立了一个default图并开始session
  with tf.Graph().as_default(), tf.Session() as session:
    #先进行initialization
    initializer = tf.random_uniform_initializer(-config.init_scale,
                                                config.init_scale)
    #注意,这里就是variable scope的运用了!
    with tf.variable_scope("model", reuse=None, initializer=initializer):
      m = PTBModel(is_training=True, config=config)
    with tf.variable_scope("model", reuse=True, initializer=initializer):
      mvalid = PTBModel(is_training=False, config=config)
      mtest = PTBModel(is_training=False, config=eval_config)

    tf.initialize_all_variables().run()

    for i in range(config.max_max_epoch):
      # 递减learning rate
      lr_decay = config.lr_decay ** max(i - config.max_epoch, 0.0)
      m.assign_lr(session, config.learning_rate * lr_decay)
      #打印出perplexity
      print("Epoch: %d Learning rate: %.3f" % (i + 1, session.run(m.lr)))
      train_perplexity = run_epoch(session, m, train_data, m.train_op,
                                   verbose=True)
      print("Epoch: %d Train Perplexity: %.3f" % (i + 1, train_perplexity))
      valid_perplexity = run_epoch(session, mvalid, valid_data, tf.no_op())
      print("Epoch: %d Valid Perplexity: %.3f" % (i + 1, valid_perplexity))

    test_perplexity = run_epoch(session, mtest, test_data, tf.no_op())
    print("Test Perplexity: %.3f" % test_perplexity)
还记得之前卖的关子么?这个重要的variable_scope函数的目的其实是允许我们在保留模型权重的情况下运行多个模型。首先,从RNN的根源上说,因为输入输出有着时间关系,我们的模型在训练时每此迭代都要运用到之前迭代的结果,所以如果我们直接使用(cell_output, state) = cell(inputs[:, time_step, :], state)我们可能会得到一堆新的RNN模型,而不是我们所期待的前一时刻的RNN模型。再看main函数,当我们训练时,我们需要的是新的模型,所以我们在定义了一个scope名为model的模型时说明了我们不需要使用以存在的参数,因为我们本来的目的就是去训练的。而在我们做validation和test的时候呢?训练新的模型将会非常不妥,所以我们需要运用之前训练好的模型的参数来测试他们的效果,故定义reuse=True。这个概念有需要的朋友可以参考Tensorflow的官方文件对共享变量的描述。
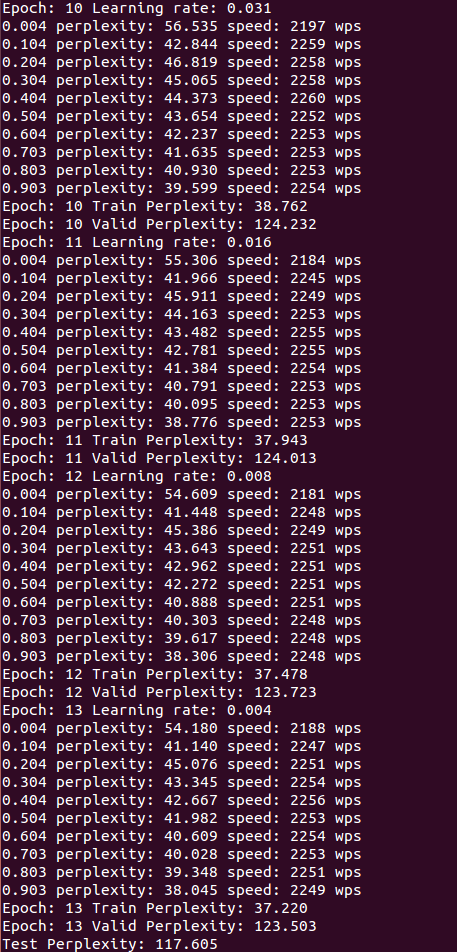
好了,我们了解了这个模型代码的架构以及运行的机制,那么他在实际运行中效果如何呢?让我们来实际测试一番。由于时间问题,我只运行了小模型,也就是不用dropout的模型。运行方式为在ptb_word_lm.py的文件夹下输入python ptb_word_lm.py --data_path=/tmp/simple-examples/data/ --model small。这里需要注意的是你需要下载simple-examples.tar.gz包,下载地址点击这里。运行结果如下:

这里简便的放入了最后结果,我们可见,在13个epoch时,我们的测试perplexity为117.605, 对应了论文里non-regularized LSTM的114.5,运行时间约5到6小时。
本站文章如无特殊说明,均为本站原创,如若转载,请注明出处:解析Tensorflow官方PTB模型的demo - Python技术站

 微信扫一扫
微信扫一扫  支付宝扫一扫

