
前段时间写了个比较简单的批量水印添加的python实现方式,将某个文件夹下面的图片全部添加上水印。
今天正好有时间就做了一个UI应用的封装,这样不需要知道python直接下载exe的应用程序使用即可。
有需要'批量图片水印添加器'的朋友可以直接跳过到文章末尾获取下载方式,下载.exe的可执行应用直接使用即可,下面主要来介绍一下实现过程。
首先,还是老规矩介绍一下在开发过程中需要用到的python非标准库,由于这些库都是之前使用过的。
所以这里就直接导入到代码块中,如果没有的话直接使用pip的方式进行安装即可。
# It imports all the classes, attributes, and methods of the PyQt5.QtCore module into the global symbol table.
from PyQt5.QtCore import *

# It imports all the classes, attributes, and methods of the PyQt5.QtWidgets module into the global symbol table.
from PyQt5.QtWidgets import QApplication, QWidget, QHBoxLayout, QVBoxLayout, QTextBrowser, QLineEdit, QPushButton,
    QFormLayout, QFileDialog, QLabel

# It imports all the classes, attributes, and methods of the PyQt5.QtGui module into the global symbol table.
from PyQt5.QtGui import QIcon, QFont, QTextCursor

# It imports the sys module.
import sys

# It imports the os module.
import os

# It imports the logger from the loguru module.
from loguru import logger

# It imports the add_mark function from the marker module in the watermarker package.
from watermarker.marker import add_mark
以上导入的python库就是在整个UI桌面应用开发过程中需要用到的,完成直接我们新建UI类PicWaterUI专门用来写一些关于桌面应用的布局。
其中包括按钮、输入框等组件,此外将组件关联的槽函数也写入到这个类中,这样有利于统一管理,代码量比较多有需要的朋友耐心阅读。

# This class is a widget that contains a QLabel and a QPushButton
class PicWaterUI(QWidget):
    def __init__(self):
        """
        A constructor. It is called when an object is created from a class and it allows the class to initialize the
        attributes of a class.
        """
        super(PicWaterUI, self).__init__()
        self.init_ui()

    def init_ui(self):
        """
        This function initializes the UI.
        """
        self.setWindowTitle('批量图片水印添加器  公众号:Python 集中营!')
        self.setWindowIcon(QIcon('water.ico'))

        self.brower = QTextBrowser()
        self.brower.setFont(QFont('宋体', 8))
        self.brower.setReadOnly(True)
        self.brower.setPlaceholderText('处理进程展示区域...')
        self.brower.ensureCursorVisible()

        self.pic_file_path = QLineEdit()
        self.pic_file_path.setPlaceholderText('源批量图片路径')
        self.pic_file_path.setReadOnly(True)

        self.pic_file_path_btn = QPushButton()
        self.pic_file_path_btn.setText('源图片路径')
        self.pic_file_path_btn.clicked.connect(self.pic_file_path_btn_click)

        self.new_pic_file_path = QLineEdit()
        self.new_pic_file_path.setPlaceholderText('新图片存储路径')
        self.new_pic_file_path.setReadOnly(True)

        self.new_pic_file_path_btn = QPushButton()
        self.new_pic_file_path_btn.setText('保存路径')
        self.new_pic_file_path_btn.clicked.connect(self.new_pic_file_path_btn_click)

        self.water_current_label = QLabel()
        self.water_current_label.setText('水印内容:')

        self.water_current_in = QLineEdit()
        self.water_current_in.setPlaceholderText('Python 集中营')

        self.water_angle_label = QLabel()
        self.water_angle_label.setText('水印角度:')

        self.water_angle_in = QLineEdit()
        self.water_angle_in.setPlaceholderText('30')

        self.water_back_label = QLabel()
        self.water_back_label.setText('水印透明度:')

        self.water_back_in = QLineEdit()
        self.water_back_in.setPlaceholderText('0.3')

        self.water_font_label = QLabel()
        self.water_font_label.setText('水印字体大小:')

        self.water_font_in = QLineEdit()
        self.water_font_in.setPlaceholderText('30')

        self.water_space_label = QLabel()
        self.water_space_label.setText('水印间隔:')

        self.water_space_in = QLineEdit()
        self.water_space_in.setPlaceholderText('40')

        self.water_color_label = QLabel()
        self.water_color_label.setText('水印颜色:')

        self.water_color_in = QLineEdit()
        self.water_color_in.setPlaceholderText('#8B8B1B')

        self.start_btn = QPushButton()
        self.start_btn.setText('开始添加水印')
        self.start_btn.clicked.connect(self.start_btn_click)

        hbox = QHBoxLayout()
        hbox.addWidget(self.brower)

        fbox = QFormLayout()
        fbox.addRow(self.pic_file_path, self.pic_file_path_btn)
        fbox.addRow(self.new_pic_file_path, self.new_pic_file_path_btn)
        fbox.addRow(self.water_current_label, self.water_current_in)
        fbox.addRow(self.water_angle_label, self.water_angle_in)
        fbox.addRow(self.water_back_label, self.water_back_in)
        fbox.addRow(self.water_font_label, self.water_font_in)
        fbox.addRow(self.water_space_label, self.water_space_in)
        fbox.addRow(self.water_color_label, self.water_color_in)

        v_vbox = QVBoxLayout()
        v_vbox.addWidget(self.start_btn)

        vbox = QVBoxLayout()
        vbox.addLayout(fbox)
        vbox.addLayout(v_vbox)

        hbox.addLayout(vbox)

        self.thread_ = PicWaterThread(self)
        self.thread_.message.connect(self.show_message)
        self.thread_.finished.connect(self.finshed)

        self.setLayout(hbox)

    def show_message(self, text):
        """
        It shows a message

        :param text: The text to be displayed
        """
        cursor = self.brower.textCursor()
        cursor.movePosition(QTextCursor.End)
        self.brower.append(text)
        self.brower.setTextCursor(cursor)
        self.brower.ensureCursorVisible()

    def pic_file_path_btn_click(self):
        """
        It opens a file dialog box and allows the user to select a file.
        """
        pic_file_path = QFileDialog.getExistingDirectory(self, '选择文件夹', os.getcwd())
        self.pic_file_path.setText(pic_file_path)

    def new_pic_file_path_btn_click(self):
        """
        This function opens a file dialog box and allows the user to select a file to save the output to.
        """
        new_pic_file_path = QFileDialog.getExistingDirectory(self, '选择文件夹', os.getcwd())
        self.new_pic_file_path.setText(new_pic_file_path)

    def start_btn_click(self):
        """
        A function that is called when the start button is clicked.
        """
        self.thread_.start()
        self.start_btn.setEnabled(False)

    def finshed(self, finished):
        """
        :param finished: A boolean value that is True if the download is finished, False otherwise
        """
        if finished is True:
            self.start_btn.setEnabled(True)
页面布局及组件部分完成之后就是业务的具体实现部分了,业务就是实现批量添加水印的效果。
这里新建了一个PicWaterThread类作为UI桌面应用的子线程专门将业务实现的部分写到这个类中。
业务部分和主线程直接分离时,一来从代码层面上看起来比较明了,二来在子线程执行业务比较慢的情况下不至于导致主线程出现卡死的情况发生。
为了达到业务和界面分离的效果,下面PicWaterThread子线程的run函数里面就是具体的业务实现部分。
# This class is a subclass of QThread, and it's used to watermark pictures
class PicWaterThread(QThread):
    # A signal that is emitted when a message is received.
    message = pyqtSignal(str)
    # A signal that is emitted when the download is finished.
    finished = pyqtSignal(bool)

    def __init__(self, parent=None):
        """
        A constructor that initializes the class.

        :param parent: The parent widget
        """
        super(PicWaterThread, self).__init__(parent)
        self.working = True
        self.parent = parent

    def __del__(self):
        """
        A destructor. It is called when the object is destroyed.
        """
        self.working = True
        self.wait()

    def run(self) -> None:
        """
        > This function runs the program
        """
        try:
            directory = self.parent.pic_file_path.text().strip()
            water_name = self.parent.water_current_in.text().strip()
            new_directory = self.parent.new_pic_file_path.text().strip()
            water_angle_in = self.parent.water_angle_in.text().strip()
            water_back_in = self.parent.water_back_in.text().strip()
            water_font_in = self.parent.water_font_in.text().strip()
            water_space_in = self.parent.water_space_in.text().strip()
            color = self.parent.water_color_in.text().strip()

            self.message.emit('源文件路径:{}'.format(directory))
            self.message.emit('水印内容:{}'.format(water_name))
            self.message.emit('保存文件路径:{}'.format(new_directory))
            self.message.emit('水印角度:{}'.format(water_angle_in))
            self.message.emit('水印透明度:{}'.format(water_back_in))
            self.message.emit('水印字体大小:{}'.format(water_font_in))
            self.message.emit('水印间隔:{}'.format(water_space_in))
            self.message.emit('水印颜色:{}'.format(color))

            if directory is None or water_name is None:
                logger.info('文件夹地址或水印名称不能为空!')
                return
            for file_name in os.listdir(directory):
                logger.info('当前文件名称:{0},即将开始添加水印操作!'.format(file_name))
                self.message.emit('当前文件名称:{0},即将开始添加水印操作!'.format(file_name))
                add_mark(file=os.path.join(directory, file_name), out=new_directory, mark=water_name,
                         opacity=float(water_back_in), angle=int(water_angle_in), space=int(water_space_in),
                         size=int(water_font_in), color=color)
                self.message.emit('当前文件名称:{0},已经完成添加水印操作!'.format(file_name))
                logger.info('当前文件名称:{0},已经完成添加水印操作!'.format(file_name))
            self.finished.emit(True)
        except Exception as e:
            self.message.emit('文件内容读取或格式化发生异常!')
            self.finished.emit(True)
完成业务以及页面应用的开发之后,我们使用main函数将整个桌面应用调起来,这种范式基本上每个桌面应用的使用是一样的。
如果需要好看一些的话还可以加上我们之前提到过的各种样式主题的应用,在公众号主页上进行搜索就可以找到之前发表的相关的文章。
if __name__ == '__main__':
    app = QApplication(sys.argv)
    main = PicWaterUI()
    main.show()
    sys.exit(app.exec_())
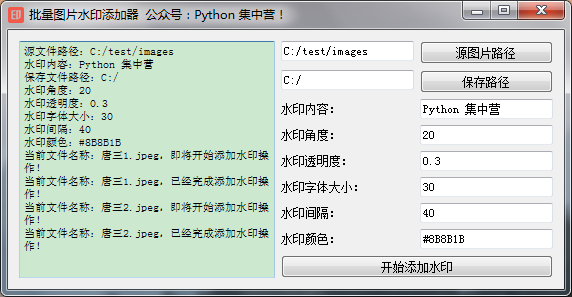
最后,我们找了两张斗罗大陆'唐三'的照片测试一下效果如何,使用上面的main函数启动整个应用之后是怎样的。
大家可以直接在应用上面选择需要批量添加水印的图片路径以及添加完成后需要保存的地方。
并且可以在生成时在桌面应用上调整水印相关的各种参数,包括水印的大小、尺寸、间隔、颜色等等,这样就可以根据自己的需要对批量图片制作属于的水印效果了。
下面是将'唐三'的照片经过该页面转换以后的效果了,基本上满足我对大批图片添加相同的水印的要求了。
接下来看一下'修罗唐三'被我们添加了'Python 集中营'的水印以后变成什么样了。


有需要.exe可执行应用的朋友在公众号内直接回复'批量图片水印添加器'获取网盘的下载链接,应用我们已经打包好了有需要的话直接下载即可。
本站文章如无特殊说明,均为本站原创,如若转载,请注明出处:周末自制了一个批量图片水印添加器! - Python技术站
 微信扫一扫
微信扫一扫  支付宝扫一扫