字幕生成是一个具有挑战性的人工智能问题,其中必须为给定的照片生成文本描述。
它既需要来自计算机视觉的方法来理解图像的内容,也需要来自自然语言处理领域的语言模型来将对图像的理解按正确的顺序转化为文字。最近,深度学习方法在这个问题的例子上取得了最先进的结果。
深度学习方法已经在字幕生成问题上展示了最先进的结果。这些方法最令人印象深刻的是,可以定义单个端到端模型来预测给定照片的标题,而不需要复杂的数据准备或专门设计的模型管道。
在本教程中,您将了解如何从头开始开发照片字幕深度学习模型。
完成本教程后,您将学会:
- 准备工作:准备用于训练深度学习模型的照片和文本数据。
- 模型训练:设计和训练深度学习字幕生成模型。
- 模型评估与使用:评估字幕生成模型并使用它来为全新照片添加字幕。
本教程分为以下6个部分:
- 照片和说明数据集
- 准备照片数据
- 准备文本数据
- 开发深度学习模型
- 渐进式加载训练(新)
- 评估模型
- 字幕生成
废话不多说,让我们开始吧!
准备工作
Python环境搭建
我们需要安装Python环境,最好是Python 3以上版本。
同时,必须安装 TensorFlow、Keras两大深度学习库,版本应该为以下相同版本号,或更高版本:
tensorflow: 2.4.0
keras: 2.4.3
另外,还要安装 NumPy 和NLTK 库。
下载训练接:照片和照片说明的训练集
Flickr8K 数据集是图像字幕入门的一个很好的数据集。
原因是因为它逼真且相对较小,因此您可以下载它并使用 CPU 在您的工作站上构建模型。(此数据集最初于2013年论文《 Framing Image Description as a Ranking Task: Data, Models and Evaluation Metrics ”》发表)。
以下是我的数据集 GitHub 存储库中的一些直接下载链接:
Flickr8k_Dataset.zip
Flickr8k_text.zip
下载数据集并将它们解压缩到您当前的工作目录中。您将有两个目录:
- Flickr8k_Dataset:包含 8092 张 JPEG 格式的照片。
- Flickr8k_text:包含许多文件,其中包含对照片的不同描述来源。
此数据由8000张图像组成,每张图像都与五个不同的标题配对,这些标题提供了对照片实体和事件的清晰描述。
该数据集具有预定义的训练数据集(6,000 张图像)、开发数据集(1,000 张图像)和测试数据集(1,000 张图像)。
可用于评估模型技能的一种度量是 BLEU 分数。作为参考,下面是在测试数据集上评估熟练模型时的一些大概 BLEU 分数(摘自 2017 年的论文“ Where to put the Image in an Image Caption Generator ”):
- BLEU-1:0.401 至 0.578。
- BLEU-2:0.176 至 0.390。
- BLEU-3:0.099 至 0.260。
- BLEU-4:0.059 至 0.170。
我们稍后会在评估模型时详细描述 BLEU 指标。
接下来,让我们看看如何加载图像。
准备照片数据
我们将使用预先训练的模型来解释照片的内容。
有许多型号可供选择。在本例中,我们将使用 2014 年赢得 ImageNet 竞赛的牛津视觉几何组 (VGG) 模型。在此处了解有关该模型的更多信息:
用于大规模视觉识别的超深度卷积网络
Keras 直接提供这种预训练模型。请注意,首次使用此模型时,Keras 将从互联网下载模型权重,约为 500 MB。这可能需要几分钟,具体取决于您的互联网连接。
我们可以将此模型用作更广泛的图像标题模型的一部分。问题是,它是一个大型模型,每次我们想要测试新的语言模型配置(下游)时,通过网络运行每张照片都是多余的。
相反,我们可以使用预先训练的模型预先计算“照片特征”并将它们保存到文件中。然后,我们可以稍后加载这些特征,并将它们作为数据集中给定照片的解释输入到我们的模型中。这与通过完整的 VGG 模型运行照片没有什么不同;只是我们会提前做一次。
这是一项优化,将使训练我们的模型更快并消耗更少的内存。
我们可以使用 VGG 类在 Keras 中加载 VGG 模型。我们将从加载的模型中删除最后一层,因为这是用于预测照片分类的模型。我们对图像分类不感兴趣,但我们对进行分类之前照片的内部表示感兴趣。这些是模型从照片中提取的“特征”。
Keras 还提供了将加载的照片重塑为模型首选尺寸的工具(例如 3 通道 224 x 224 像素图像)。
下面是一个名为extract_features() 的函数,给定一个目录名称,它将加载每张照片,为 VGG 做好准备,并从 VGG 模型中收集预测的特征。图像特征是一维 4,096 个元素向量。
该函数将图像标识符字典返回到图像特征。
# extract features from each photo in the directory
def extract_features(directory):
    # load the model
    model = VGG16()
    # re-structure the model
    model = Model(inputs=model.inputs, outputs=model.layers[-2].output)
    # summarize
    print(model.summary())
    # extract features from each photo
    features = dict()
    for name in listdir(directory):
        # load an image from file
        filename = directory + '/' + name
        image = load_img(filename, target_size=(224, 224))
        # convert the image pixels to a numpy array
        image = img_to_array(image)
        # reshape data for the model
        image = image.reshape((1, image.shape[0], image.shape[1], image.shape[2]))
        # prepare the image for the VGG model
        image = preprocess_input(image)
        # get features
        feature = model.predict(image, verbose=0)
        # get image id
        image_id = name.split('.')[0]
        # store feature
        features[image_id] = feature
        print('>%s' % name)
    return features
我们可以调用此函数来准备用于测试模型的照片数据,然后将生成的字典保存到名为“features.pkl”的文件中。
下面列出了完整的示例。
from os import listdir
from pickle import dump
from keras.applications.vgg16 import VGG16
from keras.preprocessing.image import load_img
from keras.preprocessing.image import img_to_array
from keras.applications.vgg16 import preprocess_input
from keras.models import Model

# extract features from each photo in the directory
def extract_features(directory):
    # load the model
    model = VGG16()
    # re-structure the model
    model = Model(inputs=model.inputs, outputs=model.layers[-2].output)
    # summarize
    print(model.summary())
    # extract features from each photo
    features = dict()
    for name in listdir(directory):
        # load an image from file
        filename = directory + '/' + name
        image = load_img(filename, target_size=(224, 224))
        # convert the image pixels to a numpy array
        image = img_to_array(image)
        # reshape data for the model
        image = image.reshape((1, image.shape[0], image.shape[1], image.shape[2]))
        # prepare the image for the VGG model
        image = preprocess_input(image)
        # get features
        feature = model.predict(image, verbose=0)
        # get image id
        image_id = name.split('.')[0]
        # store feature
        features[image_id] = feature
        print('>%s' % name)
    return features

# extract features from all images
directory = 'Flickr8k_Dataset'
features = extract_features(directory)
print('Extracted Features: %d' % len(features))
# save to file
dump(features, open('features.pkl', 'wb'))
准备文本数据
数据集包含每张照片的多个描述,描述的文本需要一些最少的清理。
如果您不熟悉清理文本数据,请参阅这篇文章:
- 如何使用 Python 清理机器学习的文本
首先,我们将加载包含所有描述的文件。
# load doc into memory
def load_doc(filename):
    # open the file as read only
    file = open(filename, 'r')
    # read all text
    text = file.read()
    # close the file
    file.close()
    return text

filename = 'Flickr8k_text/Flickr8k.token.txt'
# load descriptions
doc = load_doc(filename)
每张照片都有一个唯一的标识符。此标识符用于照片文件名和描述的文本文件中。
接下来,我们将逐步浏览照片描述列表。下面定义了一个函数load_descriptions(),给定加载的文档文本,它将返回描述的照片标识符字典。每个照片标识符映射到一个或多个文本说明的列表。
# extract descriptions for images
def load_descriptions(doc):
    mapping = dict()
    # process lines
    for line in doc.split('\n'):
        # split line by white space
        tokens = line.split()
        if len(line) < 2:
            continue
        # take the first token as the image id, the rest as the description
        image_id, image_desc = tokens[0], tokens[1:]
        # remove filename from image id
        image_id = image_id.split('.')[0]
        # convert description tokens back to string
        image_desc = ' '.join(image_desc)
        # create the list if needed
        if image_id not in mapping:
            mapping[image_id] = list()
        # store description
        mapping[image_id].append(image_desc)
    return mapping

# parse descriptions
descriptions = load_descriptions(doc)
print('Loaded: %d ' % len(descriptions))
接下来,我们需要清理描述文本。描述已经标记化并且易于使用。
我们将通过以下方式清理文本,以减少我们需要处理的单词词汇量:
将所有单词转换为小写。
删除所有标点符号。
删除所有长度为一个字符或更短的单词(例如“a”)。
删除所有带有数字的单词。
下面定义了clean_descriptions() 函数,该函数给定描述的图像标识符字典,逐步执行每个描述并清理文本。
import string

def clean_descriptions(descriptions):
    # prepare translation table for removing punctuation
    table = str.maketrans('', '', string.punctuation)
    for key, desc_list in descriptions.items():
        for i in range(len(desc_list)):
            desc = desc_list[i]
            # tokenize
            desc = desc.split()
            # convert to lower case
            desc = [word.lower() for word in desc]
            # remove punctuation from each token
            desc = [w.translate(table) for w in desc]
            # remove hanging 's' and 'a'
            desc = [word for word in desc if len(word)>1]
            # remove tokens with numbers in them
            desc = [word for word in desc if word.isalpha()]
            # store as string
            desc_list[i] =  ' '.join(desc)

# clean descriptions
clean_descriptions(descriptions)
清理后,我们可以总结词汇的大小。
理想情况下,我们想要一个既富有表现力又尽可能小的词汇。较小的词汇表将导致较小的模型,该模型的训练速度会更快。
作为参考,我们可以将干净的描述转换为一组并打印其大小,以了解数据集词汇表的大小。
# convert the loaded descriptions into a vocabulary of words
def to_vocabulary(descriptions):
    # build a list of all description strings
    all_desc = set()
    for key in descriptions.keys():
        [all_desc.update(d.split()) for d in descriptions[key]]
    return all_desc

# summarize vocabulary
vocabulary = to_vocabulary(descriptions)
print('Vocabulary Size: %d' % len(vocabulary))
最后,我们可以将图像标识符和描述的字典保存到一个名为descriptions.txt 的新文件中,每行有一个图像标识符和描述。
下面定义了save_descriptions() 函数,给定一个包含标识符到描述和文件名映射的字典,将映射保存到文件。
# save descriptions to file, one per line
def save_descriptions(descriptions, filename):
    lines = list()
    for key, desc_list in descriptions.items():
        for desc in desc_list:
            lines.append(key + ' ' + desc)
    data = '\n'.join(lines)
    file = open(filename, 'w')
    file.write(data)
    file.close()

# save descriptions
save_descriptions(descriptions, 'descriptions.txt')
综上所述,下面提供了完整的列表。
import string

# load doc into memory
def load_doc(filename):
    # open the file as read only
    file = open(filename, 'r')
    # read all text
    text = file.read()
    # close the file
    file.close()
    return text

# extract descriptions for images
def load_descriptions(doc):
    mapping = dict()
    # process lines
    for line in doc.split('\n'):
        # split line by white space
        tokens = line.split()
        if len(line) < 2:
            continue
        # take the first token as the image id, the rest as the description
        image_id, image_desc = tokens[0], tokens[1:]
        # remove filename from image id
        image_id = image_id.split('.')[0]
        # convert description tokens back to string
        image_desc = ' '.join(image_desc)
        # create the list if needed
        if image_id not in mapping:
            mapping[image_id] = list()
        # store description
        mapping[image_id].append(image_desc)
    return mapping

def clean_descriptions(descriptions):
    # prepare translation table for removing punctuation
    table = str.maketrans('', '', string.punctuation)
    for key, desc_list in descriptions.items():
        for i in range(len(desc_list)):
            desc = desc_list[i]
            # tokenize
            desc = desc.split()
            # convert to lower case
            desc = [word.lower() for word in desc]
            # remove punctuation from each token
            desc = [w.translate(table) for w in desc]
            # remove hanging 's' and 'a'
            desc = [word for word in desc if len(word)>1]
            # remove tokens with numbers in them
            desc = [word for word in desc if word.isalpha()]
            # store as string
            desc_list[i] =  ' '.join(desc)

# convert the loaded descriptions into a vocabulary of words
def to_vocabulary(descriptions):
    # build a list of all description strings
    all_desc = set()
    for key in descriptions.keys():
        [all_desc.update(d.split()) for d in descriptions[key]]
    return all_desc

# save descriptions to file, one per line
def save_descriptions(descriptions, filename):
    lines = list()
    for key, desc_list in descriptions.items():
        for desc in desc_list:
            lines.append(key + ' ' + desc)
    data = '\n'.join(lines)
    file = open(filename, 'w')
    file.write(data)
    file.close()

filename = 'Flickr8k_text/Flickr8k.token.txt'
# load descriptions
doc = load_doc(filename)
# parse descriptions
descriptions = load_descriptions(doc)
print('Loaded: %d ' % len(descriptions))
# clean descriptions
clean_descriptions(descriptions)
# summarize vocabulary
vocabulary = to_vocabulary(descriptions)
print('Vocabulary Size: %d' % len(vocabulary))
# save to file
save_descriptions(descriptions, 'descriptions.txt')
运行该示例首先打印加载的照片描述数 (8,092) 和干净词汇的大小(8,763 个单词)。
Loaded: 8,092
Vocabulary Size: 8,763
最后,干净的描述被写入“描述.txt”。
查看该文件,我们可以看到描述已准备好进行建模。文件中描述的顺序可能会有所不同。
2252123185_487f21e336 bunch on people are seated in stadium
2252123185_487f21e336 crowded stadium is full of people watching an event
2252123185_487f21e336 crowd of people fill up packed stadium
2252123185_487f21e336 crowd sitting in an indoor stadium
2252123185_487f21e336 stadium full of people watch game
...
开发深度学习模型
在本节中,我们将定义深度学习模型并将其拟合到训练数据集上。
本节分为以下几部分:
- 加载数据。
- 定义模型。
- 拟合模型。
- 完整示例。
加载数据
首先,我们必须加载准备好的照片和文本数据,以便我们可以使用它来拟合模型。
我们将在训练数据集中的所有照片和标题上训练数据。在训练时,我们将监视开发数据集上模型的性能,并使用该性能来决定何时将模型保存到文件。
训练数据集和开发数据集已分别在Flickr_8k.trainImages.txt和Flickr_8k.devImages.txt文件中预定义,这两个文件都包含照片文件名列表。从这些文件名中,我们可以提取照片标识符并使用这些标识符来过滤每组的照片和描述。
下面的函数load_set() 将加载一组预定义的标识符,给定训练或开发集文件名。
# load doc into memory
def load_doc(filename):
    # open the file as read only
    file = open(filename, 'r')
    # read all text
    text = file.read()
    # close the file
    file.close()
    return text

# load a pre-defined list of photo identifiers
def load_set(filename):
    doc = load_doc(filename)
    dataset = list()
    # process line by line
    for line in doc.split('\n'):
        # skip empty lines
        if len(line) < 1:
            continue
        # get the image identifier
        identifier = line.split('.')[0]
        dataset.append(identifier)
    return set(dataset)
现在,我们可以使用预定义的一组火车或开发标识符加载照片和描述。
下面是函数load_clean_descriptions(),它为一组给定的标识符加载从“descriptions.txt”中清理的文本描述,并将标识符字典返回到文本描述列表。
我们将开发的模型将在给定照片的情况下生成标题,并且标题将一次生成一个单词。先前生成的单词序列将作为输入提供。因此,我们需要一个“第一个词”来启动生成过程,需要一个“最后一个词”来表示标题的结束。
为此,我们将使用字符串 'startseq' 和 'endseq'。这些令牌在加载时会添加到加载的说明中。在对文本进行编码之前,现在执行此操作非常重要,以便令牌也正确编码。
# load clean descriptions into memory
def load_clean_descriptions(filename, dataset):
    # load document
    doc = load_doc(filename)
    descriptions = dict()
    for line in doc.split('\n'):
        # split line by white space
        tokens = line.split()
        # split id from description
        image_id, image_desc = tokens[0], tokens[1:]
        # skip images not in the set
        if image_id in dataset:
            # create list
            if image_id not in descriptions:
                descriptions[image_id] = list()
            # wrap description in tokens
            desc = 'startseq ' + ' '.join(image_desc) + ' endseq'
            # store
            descriptions[image_id].append(desc)
    return descriptions
接下来,我们可以加载给定数据集的照片特征。
下面定义了一个名为load_photo_features() 的函数,该函数加载整组照片描述,然后返回给定照片标识符集的感兴趣子集。
这不是很有效;尽管如此,这将使我们快速启动并运行。
# load photo features
def load_photo_features(filename, dataset):
    # load all features
    all_features = load(open(filename, 'rb'))
    # filter features
    features = {k: all_features[k] for k in dataset}
    return features
我们可以在这里暂停并测试到目前为止开发的所有内容。
下面列出了完整的代码示例。
from pickle import load

# load doc into memory
def load_doc(filename):
    # open the file as read only
    file = open(filename, 'r')
    # read all text
    text = file.read()
    # close the file
    file.close()
    return text

# load a pre-defined list of photo identifiers
def load_set(filename):
    doc = load_doc(filename)
    dataset = list()
    # process line by line
    for line in doc.split('\n'):
        # skip empty lines
        if len(line) < 1:
            continue
        # get the image identifier
        identifier = line.split('.')[0]
        dataset.append(identifier)
    return set(dataset)

# load clean descriptions into memory
def load_clean_descriptions(filename, dataset):
    # load document
    doc = load_doc(filename)
    descriptions = dict()
    for line in doc.split('\n'):
        # split line by white space
        tokens = line.split()
        # split id from description
        image_id, image_desc = tokens[0], tokens[1:]
        # skip images not in the set
        if image_id in dataset:
            # create list
            if image_id not in descriptions:
                descriptions[image_id] = list()
            # wrap description in tokens
            desc = 'startseq ' + ' '.join(image_desc) + ' endseq'
            # store
            descriptions[image_id].append(desc)
    return descriptions

# load photo features
def load_photo_features(filename, dataset):
    # load all features
    all_features = load(open(filename, 'rb'))
    # filter features
    features = {k: all_features[k] for k in dataset}
    return features

# load training dataset (6K)
filename = 'Flickr8k_text/Flickr_8k.trainImages.txt'
train = load_set(filename)
print('Dataset: %d' % len(train))
# descriptions
train_descriptions = load_clean_descriptions('descriptions.txt', train)
print('Descriptions: train=%d' % len(train_descriptions))
# photo features
train_features = load_photo_features('features.pkl', train)
print('Photos: train=%d' % len(train_features))
运行此示例首先在训练数据集中加载 6,000 个照片标识符。然后,这些功能用于过滤和加载已清理的描述文本和预先计算的照片特征。
我们快完成了。
Dataset: 6,000
Descriptions: train=6,000
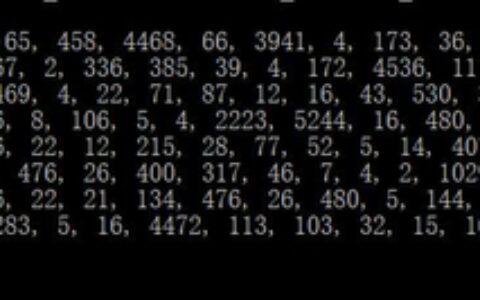
Photos: train=6,000描述文本需要编码为数字,然后才能作为输入呈现给模型或与模型的预测进行比较。
对数据进行编码的第一步是创建从单词到唯一整数值的一致映射。Keras 提供了Tokenizer类,该类可以从加载的描述数据中学习此映射。
下面定义了 to_lines() 将描述字典转换为字符串列表,以及create_tokenizer() 函数,该函数将在加载的照片描述文本下适合 Tokenizer。
# convert a dictionary of clean descriptions to a list of descriptions
def to_lines(descriptions):
    all_desc = list()
    for key in descriptions.keys():
        [all_desc.append(d) for d in descriptions[key]]
    return all_desc

# fit a tokenizer given caption descriptions
def create_tokenizer(descriptions):
    lines = to_lines(descriptions)
    tokenizer = Tokenizer()
    tokenizer.fit_on_texts(lines)
    return tokenizer

# prepare tokenizer
tokenizer = create_tokenizer(train_descriptions)
vocab_size = len(tokenizer.word_index) + 1
print('Vocabulary Size: %d' % vocab_size)
我们现在可以对文本进行编码。
每个描述将被拆分为单词。模型将提供一个单词和照片并生成下一个单词。然后,描述的前两个单词将作为图像的输入提供给模型,以生成下一个单词。这就是训练模型的方式。
例如,输入序列“小女孩在田间奔跑”将被分成 6 个输入-输出对来训练模型:
X1,     X2 (text sequence),                         y (word)
photo   startseq,                                   little
photo   startseq, little,                           girl
photo   startseq, little, girl,                     running
photo   startseq, little, girl, running,            in
photo   startseq, little, girl, running, in,        field
photo   startseq, little, girl, running, in, field, endseq
稍后,当模型用于生成描述时,生成的单词将被连接并递归提供作为输入,以生成图像的标题。
下面名为 create_sequences() 的函数,给定分词器、最大序列长度以及所有描述和照片的字典,会将数据转换为用于训练模型的输入输出数据对。模型有两个输入数组:一个用于照片要素,另一个用于编码文本。模型有一个输出,它是文本序列中编码的下一个单词。
输入文本被编码为整数,这些整数将被馈送到单词嵌入层。照片要素将直接馈送到模型的另一部分。该模型将输出一个预测,该预测将是词汇表中所有单词的概率分布。
因此,输出数据将是每个单词的独热编码版本,表示理想化的概率分布,除实际单词位置(其值为 1)外,所有单词位置的值均为 0。
# create sequences of images, input sequences and output words for an image
def create_sequences(tokenizer, max_length, descriptions, photos, vocab_size):
    X1, X2, y = list(), list(), list()
    # walk through each image identifier
    for key, desc_list in descriptions.items():
        # walk through each description for the image
        for desc in desc_list:
            # encode the sequence
            seq = tokenizer.texts_to_sequences([desc])[0]
            # split one sequence into multiple X,y pairs
            for i in range(1, len(seq)):
                # split into input and output pair
                in_seq, out_seq = seq[:i], seq[i]
                # pad input sequence
                in_seq = pad_sequences([in_seq], maxlen=max_length)[0]
                # encode output sequence
                out_seq = to_categorical([out_seq], num_classes=vocab_size)[0]
                # store
                X1.append(photos[key][0])
                X2.append(in_seq)
                y.append(out_seq)
    return array(X1), array(X2), array(y)
我们需要计算最长描述中的最大字数。下面定义了一个名为max_length() 的简短帮助程序函数。
# calculate the length of the description with the most words
def max_length(descriptions):
    lines = to_lines(descriptions)
    return max(len(d.split()) for d in lines)
我们现在有足够的数据来加载训练和开发数据集的数据,并将加载的数据转换为输入输出对,以拟合深度学习模型。
定义模型
我们将根据Marc Tanti等人在2017年的论文中描述的“合并模型”来定义深度学习:
我们将根据Marc Tanti等人在2017年的论文中描述的“合并模型”来定义深度学习:
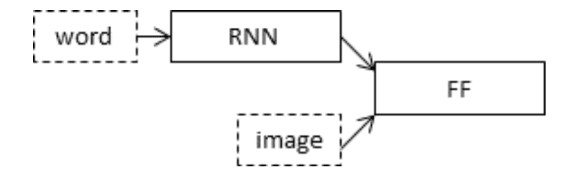
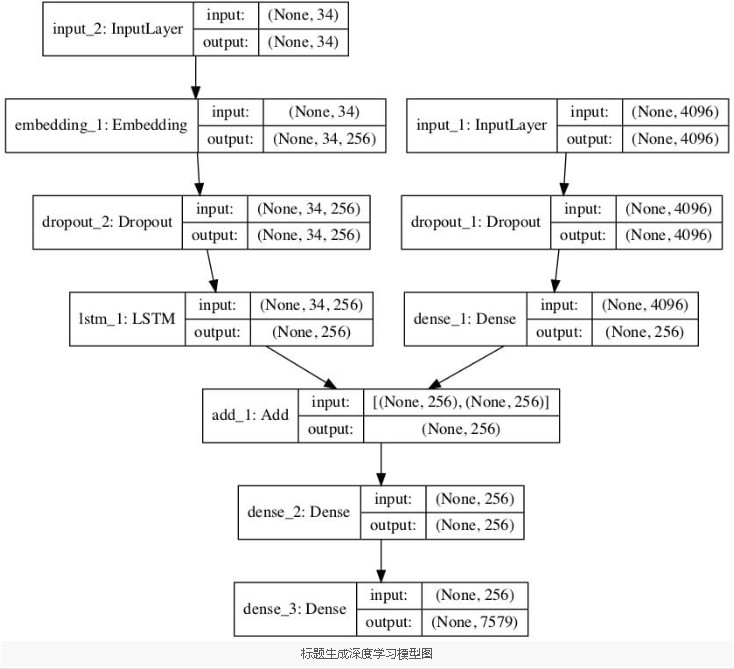
我们将分三部分描述该模型:
- 照片特征提取器。这是一个在 ImageNet 数据集上预先训练的 16 层 VGG 模型。我们已经使用 VGG 模型(没有输出层)对照片进行了预处理,并将使用该模型预测的提取特征作为输入。
- 序列处理器。这是一个用于处理文本输入的词嵌入层,后跟一个长短期记忆 (LSTM) 循环神经网络层。
- 解码器(因为没有更好的名称)。特征提取器和序列处理器都输出固定长度的向量。它们被合并在一起并由密集层处理以进行最终预测。
照片要素提取器模型预期输入照片要素为包含 4,096 个元素的向量。这些由密集层处理,以产生照片的 256 个元素表示。
序列处理器模型需要具有预定义长度(34 个单词)的输入序列,这些输入序列被馈送到使用掩码忽略填充值的嵌入层中。接下来是具有 256 个内存单元的 LSTM 层。
两个输入模型都生成 256 个元素向量。此外,两种输入模型都以 50% dropout 的形式使用正则化。这是为了减少训练数据集的过度拟合,因为此模型配置学习速度非常快。
解码器模型使用加法运算合并来自两个输入模型的向量。然后将其馈送到密集 256 神经元层,然后馈送到最终输出密集层,该层对序列中下一个单词的整个输出词汇表进行 softmax 预测。
下面名为define_model() 的函数定义并返回准备好拟合的模型。
# define the captioning model
def define_model(vocab_size, max_length):
    # feature extractor model
    inputs1 = Input(shape=(4096,))
    fe1 = Dropout(0.5)(inputs1)
    fe2 = Dense(256, activation='relu')(fe1)
    # sequence model
    inputs2 = Input(shape=(max_length,))
    se1 = Embedding(vocab_size, 256, mask_zero=True)(inputs2)
    se2 = Dropout(0.5)(se1)
    se3 = LSTM(256)(se2)
    # decoder model
    decoder1 = add([fe2, se3])
    decoder2 = Dense(256, activation='relu')(decoder1)
    outputs = Dense(vocab_size, activation='softmax')(decoder2)
    # tie it together [image, seq] [word]
    model = Model(inputs=[inputs1, inputs2], outputs=outputs)
    model.compile(loss='categorical_crossentropy', optimizer='adam')
    # summarize model
    print(model.summary())
    plot_model(model, to_file='model.png', show_shapes=True)
    return model
____________________________________________________________________________________________________
Layer (type) Output Shape Param # Connected to
====================================================================================================
input_2 (InputLayer) (None, 34) 0
____________________________________________________________________________________________________
input_1 (InputLayer) (None, 4096) 0
____________________________________________________________________________________________________
embedding_1 (Embedding) (None, 34, 256) 1940224 input_2[0][0]
____________________________________________________________________________________________________
dropout_1 (Dropout) (None, 4096) 0 input_1[0][0]
____________________________________________________________________________________________________
dropout_2 (Dropout) (None, 34, 256) 0 embedding_1[0][0]
____________________________________________________________________________________________________
dense_1 (Dense) (None, 256) 1048832 dropout_1[0][0]
____________________________________________________________________________________________________
lstm_1 (LSTM) (None, 256) 525312 dropout_2[0][0]
____________________________________________________________________________________________________
add_1 (Add) (None, 256) 0 dense_1[0][0]
lstm_1[0][0]
____________________________________________________________________________________________________
dense_2 (Dense) (None, 256) 65792 add_1[0][0]
____________________________________________________________________________________________________
dense_3 (Dense) (None, 7579) 1947803 dense_2[0][0]
====================================================================================================
Total params: 5,527,963
Trainable params: 5,527,963
Non-trainable params: 0
____________________________________________________________________________________________________我们还创建了一个图来可视化网络的结构,从而更好地帮助理解两个输入流。
拟合模型
现在我们知道了如何定义模型,我们可以将其拟合到训练数据集上。
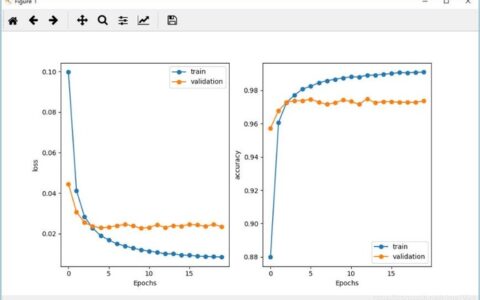
该模型快速学习并快速过度拟合训练数据集。因此,我们将监视维持开发数据集上训练模型的技能。当开发数据集上的模型技能在纪元结束时提高时,我们会将整个模型保存到文件中。
在运行结束时,我们可以将训练数据集上具有最佳技能的保存模型用作最终模型。
为此,我们可以通过在 Keras 中定义一个 ModelCheckpoint并指定它来监控验证数据集上的最小损失,并将模型保存到文件名中同时包含训练和验证损失的文件中。
# define checkpoint callback
filepath = 'model-ep{epoch:03d}-loss{loss:.3f}-val_loss{val_loss:.3f}.h5'
checkpoint = ModelCheckpoint(filepath, monitor='val_loss', verbose=1, save_best_only=True, mode='min')
然后,我们可以通过回调参数在调用fit() 时指定检查点。我们还必须在fit() 中通过validation_data参数指定开发数据集。
我们只会拟合 20 个 epoch 的模型,但考虑到训练数据量,在现代硬件上,每个 epoch 可能需要 30 分钟。
# fit model
model.fit([X1train, X2train], ytrain, epochs=20, verbose=2, callbacks=[checkpoint], validation_data=([X1test, X2test], ytest))
完整代码
下面列出了在训练数据上拟合模型的完整示例。
from numpy import array
from pickle import load
from keras.preprocessing.text import Tokenizer
from keras.preprocessing.sequence import pad_sequences
from keras.utils import to_categorical
from keras.utils import plot_model
from keras.models import Model
from keras.layers import Input
from keras.layers import Dense
from keras.layers import LSTM
from keras.layers import Embedding
from keras.layers import Dropout
from keras.layers.merge import add
from keras.callbacks import ModelCheckpoint

# load doc into memory
def load_doc(filename):
    # open the file as read only
    file = open(filename, 'r')
    # read all text
    text = file.read()
    # close the file
    file.close()
    return text

# load a pre-defined list of photo identifiers
def load_set(filename):
    doc = load_doc(filename)
    dataset = list()
    # process line by line
    for line in doc.split('\n'):
        # skip empty lines
        if len(line) < 1:
            continue
        # get the image identifier
        identifier = line.split('.')[0]
        dataset.append(identifier)
    return set(dataset)

# load clean descriptions into memory
def load_clean_descriptions(filename, dataset):
    # load document
    doc = load_doc(filename)
    descriptions = dict()
    for line in doc.split('\n'):
        # split line by white space
        tokens = line.split()
        # split id from description
        image_id, image_desc = tokens[0], tokens[1:]
        # skip images not in the set
        if image_id in dataset:
            # create list
            if image_id not in descriptions:
                descriptions[image_id] = list()
            # wrap description in tokens
            desc = 'startseq ' + ' '.join(image_desc) + ' endseq'
            # store
            descriptions[image_id].append(desc)
    return descriptions

# load photo features
def load_photo_features(filename, dataset):
    # load all features
    all_features = load(open(filename, 'rb'))
    # filter features
    features = {k: all_features[k] for k in dataset}
    return features

# covert a dictionary of clean descriptions to a list of descriptions
def to_lines(descriptions):
    all_desc = list()
    for key in descriptions.keys():
        [all_desc.append(d) for d in descriptions[key]]
    return all_desc

# fit a tokenizer given caption descriptions
def create_tokenizer(descriptions):
    lines = to_lines(descriptions)
    tokenizer = Tokenizer()
    tokenizer.fit_on_texts(lines)
    return tokenizer

# calculate the length of the description with the most words
def max_length(descriptions):
    lines = to_lines(descriptions)
    return max(len(d.split()) for d in lines)

# create sequences of images, input sequences and output words for an image
def create_sequences(tokenizer, max_length, descriptions, photos, vocab_size):
    X1, X2, y = list(), list(), list()
    # walk through each image identifier
    for key, desc_list in descriptions.items():
        # walk through each description for the image
        for desc in desc_list:
            # encode the sequence
            seq = tokenizer.texts_to_sequences([desc])[0]
            # split one sequence into multiple X,y pairs
            for i in range(1, len(seq)):
                # split into input and output pair
                in_seq, out_seq = seq[:i], seq[i]
                # pad input sequence
                in_seq = pad_sequences([in_seq], maxlen=max_length)[0]
                # encode output sequence
                out_seq = to_categorical([out_seq], num_classes=vocab_size)[0]
                # store
                X1.append(photos[key][0])
                X2.append(in_seq)
                y.append(out_seq)
    return array(X1), array(X2), array(y)

# define the captioning model
def define_model(vocab_size, max_length):
    # feature extractor model
    inputs1 = Input(shape=(4096,))
    fe1 = Dropout(0.5)(inputs1)
    fe2 = Dense(256, activation='relu')(fe1)
    # sequence model
    inputs2 = Input(shape=(max_length,))
    se1 = Embedding(vocab_size, 256, mask_zero=True)(inputs2)
    se2 = Dropout(0.5)(se1)
    se3 = LSTM(256)(se2)
    # decoder model
    decoder1 = add([fe2, se3])
    decoder2 = Dense(256, activation='relu')(decoder1)
    outputs = Dense(vocab_size, activation='softmax')(decoder2)
    # tie it together [image, seq] [word]
    model = Model(inputs=[inputs1, inputs2], outputs=outputs)
    model.compile(loss='categorical_crossentropy', optimizer='adam')
    # summarize model
    print(model.summary())
    plot_model(model, to_file='model.png', show_shapes=True)
    return model

# train dataset

# load training dataset (6K)
filename = 'Flickr8k_text/Flickr_8k.trainImages.txt'
train = load_set(filename)
print('Dataset: %d' % len(train))
# descriptions
train_descriptions = load_clean_descriptions('descriptions.txt', train)
print('Descriptions: train=%d' % len(train_descriptions))
# photo features
train_features = load_photo_features('features.pkl', train)
print('Photos: train=%d' % len(train_features))
# prepare tokenizer
tokenizer = create_tokenizer(train_descriptions)
vocab_size = len(tokenizer.word_index) + 1
print('Vocabulary Size: %d' % vocab_size)
# determine the maximum sequence length
max_length = max_length(train_descriptions)
print('Description Length: %d' % max_length)
# prepare sequences
X1train, X2train, ytrain = create_sequences(tokenizer, max_length, train_descriptions, train_features, vocab_size)

# dev dataset

# load test set
filename = 'Flickr8k_text/Flickr_8k.devImages.txt'
test = load_set(filename)
print('Dataset: %d' % len(test))
# descriptions
test_descriptions = load_clean_descriptions('descriptions.txt', test)
print('Descriptions: test=%d' % len(test_descriptions))
# photo features
test_features = load_photo_features('features.pkl', test)
print('Photos: test=%d' % len(test_features))
# prepare sequences
X1test, X2test, ytest = create_sequences(tokenizer, max_length, test_descriptions, test_features, vocab_size)

# fit model

# define the model
model = define_model(vocab_size, max_length)
# define checkpoint callback
filepath = 'model-ep{epoch:03d}-loss{loss:.3f}-val_loss{val_loss:.3f}.h5'
checkpoint = ModelCheckpoint(filepath, monitor='val_loss', verbose=1, save_best_only=True, mode='min')
# fit model
model.fit([X1train, X2train], ytrain, epochs=20, verbose=2, callbacks=[checkpoint], validation_data=([X1test, X2test], ytest))
首先运行示例会打印加载的训练和开发数据集的摘要。
Dataset: 6,000
Descriptions: train=6,000
Photos: train=6,000
Vocabulary Size: 7,579
Description Length: 34
Dataset: 1,000
Descriptions: test=1,000
Photos: test=1,000
在模型摘要之后,我们可以了解训练和验证(开发)输入输出对的总数。
Train on 306,404 samples, validate on 50,903 samples然后,模型将运行,在此过程中将最佳模型保存到 .h5 文件中。
在我的运行中,最佳验证结果已保存到文件中:
- 型号-EP002-损耗3.245-val_loss3.612.h5
此模型在纪元 2 结束时保存,训练数据集损失为 3.245,开发数据集损失为 3.612
注意:根据算法或评估过程的随机性质或数值精度的差异,您的结果可能会有所不同。请考虑运行几次示例并比较平均结果。
您是否收到如下错误:Memory Error
如果是这样,请参阅下一节。
渐进式加载
注意:如果您在上一节中没有问题,请跳过本节。本节适用于上一节中所述没有足够的内存来训练模型的用户(例如,无论出于何种原因无法使用 AWS EC2)。
字幕模型的训练确实假设您有大量 RAM。
上一节中的代码不节省内存,假设您在具有 32GB 或 64GB RAM 的大型 EC2 实例上运行。如果在具有 8GB RAM 的工作站上运行代码,则无法训练模型。
如果要使用渐进式加载来训练此模型,本节将介绍如何操作。
第一步是我们必须定义一个可以用作数据生成器的函数。
我们将保持非常简单,并让数据生成器每批生成一张照片的数据。这将是为照片及其描述集生成的所有序列。
下面的函数 data_generator() 将是数据生成器,将采用加载的文本描述、照片特征、分词器和最大长度。在这里,我假设您可以将这些训练数据放入内存中,我相信 8GB 的 RAM 应该更有能力。
# data generator, intended to be used in a call to model.fit_generator()
def data_generator(descriptions, photos, tokenizer, max_length, vocab_size):
    # loop for ever over images
    while 1:
        for key, desc_list in descriptions.items():
            # retrieve the photo feature
            photo = photos[key][0]
            in_img, in_seq, out_word = create_sequences(tokenizer, max_length, desc_list, photo, vocab_size)
            yield [in_img, in_seq], out_word
您可以看到我们正在调用create_sequence() 函数来为单张照片而不是整个数据集创建一批数据。这意味着我们必须更新create_sequences() 函数以删除“遍历所有描述”for 循环。
更新后的函数如下:
# create sequences of images, input sequences and output words for an image
def create_sequences(tokenizer, max_length, desc_list, photo, vocab_size):
    X1, X2, y = list(), list(), list()
    # walk through each description for the image
    for desc in desc_list:
        # encode the sequence
        seq = tokenizer.texts_to_sequences([desc])[0]
        # split one sequence into multiple X,y pairs
        for i in range(1, len(seq)):
            # split into input and output pair
            in_seq, out_seq = seq[:i], seq[i]
            # pad input sequence
            in_seq = pad_sequences([in_seq], maxlen=max_length)[0]
            # encode output sequence
            out_seq = to_categorical([out_seq], num_classes=vocab_size)[0]
            # store
            X1.append(photo)
            X2.append(in_seq)
            y.append(out_seq)
    return array(X1), array(X2), array(y)
我们现在几乎拥有了我们需要的一切。
请注意,这是一个非常基本的数据生成器。它提供的大量内存节省是在拟合模型之前不会在内存中展开训练和测试数据的展开序列,这些样本(例如来自 create_sequences()的结果)是根据每张照片的需要创建的。
进一步改进此数据生成器的一些即兴想法包括:
随机化每个纪元的照片顺序。
使用照片 ID 列表,并根据需要加载文本和照片数据,以进一步减少内存。
每批产生多张照片的样品。
我自己过去也经历过这些变化。让我知道您是否这样做以及如何在评论中进行操作。
可以通过直接调用数据生成器来检查数据生成器的健全性,如下所示:
# test the data generator
generator = data_generator(train_descriptions, train_features, tokenizer, max_length, vocab_size)
inputs, outputs = next(generator)
print(inputs[0].shape)
print(inputs[1].shape)
print(outputs.shape)
运行此健全性检查将显示一批序列的外观,在本例中为第一张照片训练 47 个样本。
(47, 4096)
(47, 34)
(47, 7579)
最后,我们可以在模型上使用fit_generator() 函数来使用此数据生成器来训练模型。
在这个简单的示例中,我们将放弃开发数据集和模型检查点的加载,并在每个训练周期后简单地保存模型。然后,您可以在训练后返回并加载/评估每个保存的模型,以找到我们可以在下一节中使用的损耗最低的模型。
使用数据生成器训练模型的代码如下所示:
# train the model, run epochs manually and save after each epoch
epochs = 20
steps = len(train_descriptions)
for i in range(epochs):
    # create the data generator
    generator = data_generator(train_descriptions, train_features, tokenizer, max_length, vocab_size)
    # fit for one epoch
    model.fit_generator(generator, epochs=1, steps_per_epoch=steps, verbose=1)
    # save model
    model.save('model_' + str(i) + '.h5')
就是这样。现在,您可以使用渐进式加载来训练模型并节省大量 RAM。这也可能慢得多。
下面列出了用于训练字幕生成模型的渐进式加载(使用数据生成器)的完整更新示例。
from numpy import array
from pickle import load
from keras.preprocessing.text import Tokenizer
from keras.preprocessing.sequence import pad_sequences
from keras.utils import to_categorical
from keras.utils import plot_model
from keras.models import Model
from keras.layers import Input
from keras.layers import Dense
from keras.layers import LSTM
from keras.layers import Embedding
from keras.layers import Dropout
from keras.layers.merge import add
from keras.callbacks import ModelCheckpoint

# load doc into memory
def load_doc(filename):
    # open the file as read only
    file = open(filename, 'r')
    # read all text
    text = file.read()
    # close the file
    file.close()
    return text

# load a pre-defined list of photo identifiers
def load_set(filename):
    doc = load_doc(filename)
    dataset = list()
    # process line by line
    for line in doc.split('\n'):
        # skip empty lines
        if len(line) < 1:
            continue
        # get the image identifier
        identifier = line.split('.')[0]
        dataset.append(identifier)
    return set(dataset)

# load clean descriptions into memory
def load_clean_descriptions(filename, dataset):
    # load document
    doc = load_doc(filename)
    descriptions = dict()
    for line in doc.split('\n'):
        # split line by white space
        tokens = line.split()
        # split id from description
        image_id, image_desc = tokens[0], tokens[1:]
        # skip images not in the set
        if image_id in dataset:
            # create list
            if image_id not in descriptions:
                descriptions[image_id] = list()
            # wrap description in tokens
            desc = 'startseq ' + ' '.join(image_desc) + ' endseq'
            # store
            descriptions[image_id].append(desc)
    return descriptions

# load photo features
def load_photo_features(filename, dataset):
    # load all features
    all_features = load(open(filename, 'rb'))
    # filter features
    features = {k: all_features[k] for k in dataset}
    return features

# covert a dictionary of clean descriptions to a list of descriptions
def to_lines(descriptions):
    all_desc = list()
    for key in descriptions.keys():
        [all_desc.append(d) for d in descriptions[key]]
    return all_desc

# fit a tokenizer given caption descriptions
def create_tokenizer(descriptions):
    lines = to_lines(descriptions)
    tokenizer = Tokenizer()
    tokenizer.fit_on_texts(lines)
    return tokenizer

# calculate the length of the description with the most words
def max_length(descriptions):
    lines = to_lines(descriptions)
    return max(len(d.split()) for d in lines)

# create sequences of images, input sequences and output words for an image
def create_sequences(tokenizer, max_length, desc_list, photo, vocab_size):
    X1, X2, y = list(), list(), list()
    # walk through each description for the image
    for desc in desc_list:
        # encode the sequence
        seq = tokenizer.texts_to_sequences([desc])[0]
        # split one sequence into multiple X,y pairs
        for i in range(1, len(seq)):
            # split into input and output pair
            in_seq, out_seq = seq[:i], seq[i]
            # pad input sequence
            in_seq = pad_sequences([in_seq], maxlen=max_length)[0]
            # encode output sequence
            out_seq = to_categorical([out_seq], num_classes=vocab_size)[0]
            # store
            X1.append(photo)
            X2.append(in_seq)
            y.append(out_seq)
    return array(X1), array(X2), array(y)

# define the captioning model
def define_model(vocab_size, max_length):
    # feature extractor model
    inputs1 = Input(shape=(4096,))
    fe1 = Dropout(0.5)(inputs1)
    fe2 = Dense(256, activation='relu')(fe1)
    # sequence model
    inputs2 = Input(shape=(max_length,))
    se1 = Embedding(vocab_size, 256, mask_zero=True)(inputs2)
    se2 = Dropout(0.5)(se1)
    se3 = LSTM(256)(se2)
    # decoder model
    decoder1 = add([fe2, se3])
    decoder2 = Dense(256, activation='relu')(decoder1)
    outputs = Dense(vocab_size, activation='softmax')(decoder2)
    # tie it together [image, seq] [word]
    model = Model(inputs=[inputs1, inputs2], outputs=outputs)
    # compile model
    model.compile(loss='categorical_crossentropy', optimizer='adam')
    # summarize model
    model.summary()
    plot_model(model, to_file='model.png', show_shapes=True)
    return model

# data generator, intended to be used in a call to model.fit_generator()
def data_generator(descriptions, photos, tokenizer, max_length, vocab_size):
    # loop for ever over images
    while 1:
        for key, desc_list in descriptions.items():
            # retrieve the photo feature
            photo = photos[key][0]
            in_img, in_seq, out_word = create_sequences(tokenizer, max_length, desc_list, photo, vocab_size)
            yield [in_img, in_seq], out_word

# load training dataset (6K)
filename = 'Flickr8k_text/Flickr_8k.trainImages.txt'
train = load_set(filename)
print('Dataset: %d' % len(train))
# descriptions
train_descriptions = load_clean_descriptions('descriptions.txt', train)
print('Descriptions: train=%d' % len(train_descriptions))
# photo features
train_features = load_photo_features('features.pkl', train)
print('Photos: train=%d' % len(train_features))
# prepare tokenizer
tokenizer = create_tokenizer(train_descriptions)
vocab_size = len(tokenizer.word_index) + 1
print('Vocabulary Size: %d' % vocab_size)
# determine the maximum sequence length
max_length = max_length(train_descriptions)
print('Description Length: %d' % max_length)

# define the model
model = define_model(vocab_size, max_length)
# train the model, run epochs manually and save after each epoch
epochs = 20
steps = len(train_descriptions)
for i in range(epochs):
    # create the data generator
    generator = data_generator(train_descriptions, train_features, tokenizer, max_length, vocab_size)
    # fit for one epoch
    model.fit_generator(generator, epochs=1, steps_per_epoch=steps, verbose=1)
    # save model
    model.save('model_' + str(i) + '.h5')
也许可以评估每个保存的模型,并选择维持数据集上损失最低的最终模型。下一节可能会对此有所帮助。
评估模型
模型拟合后,我们可以在维持测试数据集上评估其预测的技能。
我们将通过为测试数据集中的所有照片生成描述并使用标准成本函数评估这些预测来评估模型。
首先,我们需要能够使用经过训练的模型为照片生成描述。
这涉及传入开始描述标记“startseq”,生成一个单词,然后使用生成的单词作为输入递归调用模型,直到达到序列标记的末尾“endseq”或达到最大描述长度。
下面名为generate_desc() 的函数实现了此行为,并在给定训练模型和给定准备好的照片作为输入的情况下生成文本描述。它调用函数word_for_id() 以便将整数预测映射回单词。
# map an integer to a word
def word_for_id(integer, tokenizer):
    for word, index in tokenizer.word_index.items():
        if index == integer:
            return word
    return None

# generate a description for an image
def generate_desc(model, tokenizer, photo, max_length):
    # seed the generation process
    in_text = 'startseq'
    # iterate over the whole length of the sequence
    for i in range(max_length):
        # integer encode input sequence
        sequence = tokenizer.texts_to_sequences([in_text])[0]
        # pad input
        sequence = pad_sequences([sequence], maxlen=max_length)
        # predict next word
        yhat = model.predict([photo,sequence], verbose=0)
        # convert probability to integer
        yhat = argmax(yhat)
        # map integer to word
        word = word_for_id(yhat, tokenizer)
        # stop if we cannot map the word
        if word is None:
            break
        # append as input for generating the next word
        in_text += ' ' + word
        # stop if we predict the end of the sequence
        if word == 'endseq':
            break
    return in_text
我们将为测试数据集和训练数据集中的所有照片生成预测。
下面名为evaluate_model() 的函数将根据给定的照片描述和照片特征数据集评估经过训练的模型。实际描述和预测描述是使用语料库BLEU分数集体收集和评估的,该分数汇总了生成的文本与预期文本的接近程度。
# evaluate the skill of the model
def evaluate_model(model, descriptions, photos, tokenizer, max_length):
    actual, predicted = list(), list()
    # step over the whole set
    for key, desc_list in descriptions.items():
        # generate description
        yhat = generate_desc(model, tokenizer, photos[key], max_length)
        # store actual and predicted
        references = [d.split() for d in desc_list]
        actual.append(references)
        predicted.append(yhat.split())
    # calculate BLEU score
    print('BLEU-1: %f' % corpus_bleu(actual, predicted, weights=(1.0, 0, 0, 0)))
    print('BLEU-2: %f' % corpus_bleu(actual, predicted, weights=(0.5, 0.5, 0, 0)))
    print('BLEU-3: %f' % corpus_bleu(actual, predicted, weights=(0.3, 0.3, 0.3, 0)))
    print('BLEU-4: %f' % corpus_bleu(actual, predicted, weights=(0.25, 0.25, 0.25, 0.25)))
BLEU分数用于文本翻译中,用于根据一个或多个参考翻译评估翻译的文本。
在这里,我们将每个生成的描述与照片的所有参考描述进行比较。然后,我们计算 1、2、3 和 4 个累积 n-gram 的BLEU分数。
我们可以将所有这些与上一节中用于加载数据的函数放在一起。我们首先需要加载训练数据集以准备一个 Tokenizer,以便我们可以将生成的单词编码为模型的输入序列。至关重要的是,我们使用与训练模型时完全相同的编码方案对生成的单词进行编码。
然后,我们使用这些函数来加载测试数据集。
下面列出了完整的代码。
from numpy import argmax
from pickle import load
from keras.preprocessing.text import Tokenizer
from keras.preprocessing.sequence import pad_sequences
from keras.models import load_model
from nltk.translate.bleu_score import corpus_bleu

# load doc into memory
def load_doc(filename):
    # open the file as read only
    file = open(filename, 'r')
    # read all text
    text = file.read()
    # close the file
    file.close()
    return text

# load a pre-defined list of photo identifiers
def load_set(filename):
    doc = load_doc(filename)
    dataset = list()
    # process line by line
    for line in doc.split('\n'):
        # skip empty lines
        if len(line) < 1:
            continue
        # get the image identifier
        identifier = line.split('.')[0]
        dataset.append(identifier)
    return set(dataset)

# load clean descriptions into memory
def load_clean_descriptions(filename, dataset):
    # load document
    doc = load_doc(filename)
    descriptions = dict()
    for line in doc.split('\n'):
        # split line by white space
        tokens = line.split()
        # split id from description
        image_id, image_desc = tokens[0], tokens[1:]
        # skip images not in the set
        if image_id in dataset:
            # create list
            if image_id not in descriptions:
                descriptions[image_id] = list()
            # wrap description in tokens
            desc = 'startseq ' + ' '.join(image_desc) + ' endseq'
            # store
            descriptions[image_id].append(desc)
    return descriptions

# load photo features
def load_photo_features(filename, dataset):
    # load all features
    all_features = load(open(filename, 'rb'))
    # filter features
    features = {k: all_features[k] for k in dataset}
    return features

# covert a dictionary of clean descriptions to a list of descriptions
def to_lines(descriptions):
    all_desc = list()
    for key in descriptions.keys():
        [all_desc.append(d) for d in descriptions[key]]
    return all_desc

# fit a tokenizer given caption descriptions
def create_tokenizer(descriptions):
    lines = to_lines(descriptions)
    tokenizer = Tokenizer()
    tokenizer.fit_on_texts(lines)
    return tokenizer

# calculate the length of the description with the most words
def max_length(descriptions):
    lines = to_lines(descriptions)
    return max(len(d.split()) for d in lines)

# map an integer to a word
def word_for_id(integer, tokenizer):
    for word, index in tokenizer.word_index.items():
        if index == integer:
            return word
    return None

# generate a description for an image
def generate_desc(model, tokenizer, photo, max_length):
    # seed the generation process
    in_text = 'startseq'
    # iterate over the whole length of the sequence
    for i in range(max_length):
        # integer encode input sequence
        sequence = tokenizer.texts_to_sequences([in_text])[0]
        # pad input
        sequence = pad_sequences([sequence], maxlen=max_length)
        # predict next word
        yhat = model.predict([photo,sequence], verbose=0)
        # convert probability to integer
        yhat = argmax(yhat)
        # map integer to word
        word = word_for_id(yhat, tokenizer)
        # stop if we cannot map the word
        if word is None:
            break
        # append as input for generating the next word
        in_text += ' ' + word
        # stop if we predict the end of the sequence
        if word == 'endseq':
            break
    return in_text

# evaluate the skill of the model
def evaluate_model(model, descriptions, photos, tokenizer, max_length):
    actual, predicted = list(), list()
    # step over the whole set
    for key, desc_list in descriptions.items():
        # generate description
        yhat = generate_desc(model, tokenizer, photos[key], max_length)
        # store actual and predicted
        references = [d.split() for d in desc_list]
        actual.append(references)
        predicted.append(yhat.split())
    # calculate BLEU score
    print('BLEU-1: %f' % corpus_bleu(actual, predicted, weights=(1.0, 0, 0, 0)))
    print('BLEU-2: %f' % corpus_bleu(actual, predicted, weights=(0.5, 0.5, 0, 0)))
    print('BLEU-3: %f' % corpus_bleu(actual, predicted, weights=(0.3, 0.3, 0.3, 0)))
    print('BLEU-4: %f' % corpus_bleu(actual, predicted, weights=(0.25, 0.25, 0.25, 0.25)))

# prepare tokenizer on train set

# load training dataset (6K)
filename = 'Flickr8k_text/Flickr_8k.trainImages.txt'
train = load_set(filename)
print('Dataset: %d' % len(train))
# descriptions
train_descriptions = load_clean_descriptions('descriptions.txt', train)
print('Descriptions: train=%d' % len(train_descriptions))
# prepare tokenizer
tokenizer = create_tokenizer(train_descriptions)
vocab_size = len(tokenizer.word_index) + 1
print('Vocabulary Size: %d' % vocab_size)
# determine the maximum sequence length
max_length = max_length(train_descriptions)
print('Description Length: %d' % max_length)

# prepare test set

# load test set
filename = 'Flickr8k_text/Flickr_8k.testImages.txt'
test = load_set(filename)
print('Dataset: %d' % len(test))
# descriptions
test_descriptions = load_clean_descriptions('descriptions.txt', test)
print('Descriptions: test=%d' % len(test_descriptions))
# photo features
test_features = load_photo_features('features.pkl', test)
print('Photos: test=%d' % len(test_features))

# load the model
filename = 'model-ep002-loss3.245-val_loss3.612.h5'
model = load_model(filename)
# evaluate model
evaluate_model(model, test_descriptions, test_features, tokenizer, max_length)
运行该示例将打印BLEU分数。
注意:根据算法或评估过程的随机性质或数值精度的差异,您的结果可能会有所不同。请考虑运行几次示例并比较平均结果。
我们可以看到,分数符合并接近问题熟练模型的预期范围的顶部。所选的模型配置绝不是优化的。
BLEU-1: 0.579114
BLEU-2: 0.344856
BLEU-3: 0.252154
BLEU-4: 0.131446
生成识别描述
现在我们知道了如何开发和评估字幕生成模型,我们该如何使用它?
为全新照片生成标题所需的几乎所有内容都在模型文件中。
我们还需要 Tokenizer 在生成序列时对模型生成的单词进行编码,以及定义模型时使用的输入序列的最大长度(例如 34)。
我们可以对最大序列长度进行硬编码。通过文本编码,我们可以创建分词器并将其保存到文件中,以便我们可以在需要时快速加载它,而无需整个 Flickr8K 数据集。另一种方法是在训练期间使用我们自己的词汇表文件并映射到整数函数。
我们可以像以前一样创建分词器,并将其保存为泡菜文件tokenizer.pkl。下面列出了完整的示例。
from keras.preprocessing.text import Tokenizer
from pickle import dump

# load doc into memory
def load_doc(filename):
    # open the file as read only
    file = open(filename, 'r')
    # read all text
    text = file.read()
    # close the file
    file.close()
    return text

# load a pre-defined list of photo identifiers
def load_set(filename):
    doc = load_doc(filename)
    dataset = list()
    # process line by line
    for line in doc.split('\n'):
        # skip empty lines
        if len(line) < 1:
            continue
        # get the image identifier
        identifier = line.split('.')[0]
        dataset.append(identifier)
    return set(dataset)

# load clean descriptions into memory
def load_clean_descriptions(filename, dataset):
    # load document
    doc = load_doc(filename)
    descriptions = dict()
    for line in doc.split('\n'):
        # split line by white space
        tokens = line.split()
        # split id from description
        image_id, image_desc = tokens[0], tokens[1:]
        # skip images not in the set
        if image_id in dataset:
            # create list
            if image_id not in descriptions:
                descriptions[image_id] = list()
            # wrap description in tokens
            desc = 'startseq ' + ' '.join(image_desc) + ' endseq'
            # store
            descriptions[image_id].append(desc)
    return descriptions

# covert a dictionary of clean descriptions to a list of descriptions
def to_lines(descriptions):
    all_desc = list()
    for key in descriptions.keys():
        [all_desc.append(d) for d in descriptions[key]]
    return all_desc

# fit a tokenizer given caption descriptions
def create_tokenizer(descriptions):
    lines = to_lines(descriptions)
    tokenizer = Tokenizer()
    tokenizer.fit_on_texts(lines)
    return tokenizer

# load training dataset (6K)
filename = 'Flickr8k_text/Flickr_8k.trainImages.txt'
train = load_set(filename)
print('Dataset: %d' % len(train))
# descriptions
train_descriptions = load_clean_descriptions('descriptions.txt', train)
print('Descriptions: train=%d' % len(train_descriptions))
# prepare tokenizer
tokenizer = create_tokenizer(train_descriptions)
# save the tokenizer
dump(tokenizer, open('tokenizer.pkl', 'wb'))
现在,我们可以在需要时加载分词器,而无需加载注释的整个训练数据集。
现在,让我们为新照片生成描述。
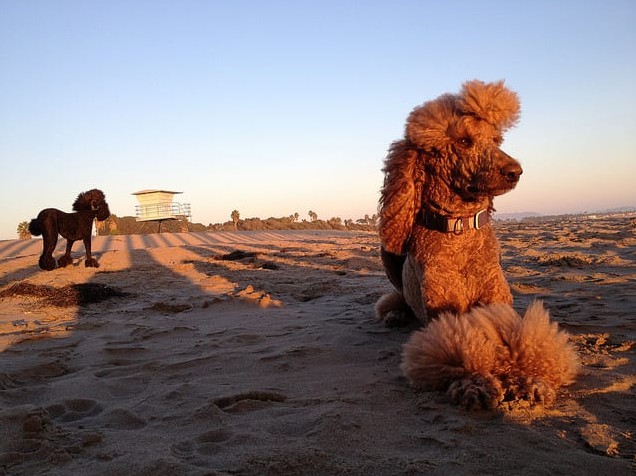
下面是我在Flickr上随机选择的新照片(在宽松许可证下可用)
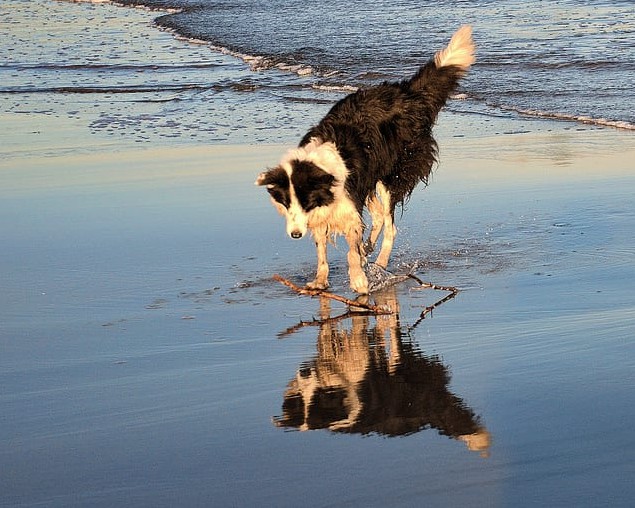
我们将使用我们的模型为其生成描述。
下载照片并将其保存到本地目录,文件名为“example.jpg”。
首先,我们必须从tokenizer.pkl 加载 Tokenizer,并定义要生成的序列的最大长度,这是填充输入所需的。
# load the tokenizer
tokenizer = load(open('tokenizer.pkl', 'rb'))
# pre-define the max sequence length (from training)
max_length = 34
然后我们必须像以前一样加载模型。
# load the model
model = load_model('model-ep002-loss3.245-val_loss3.612.h5')
接下来,我们必须加载要描述和提取特征的照片。
我们可以通过重新定义模型并向其添加 VGG-16 模型来做到这一点,或者我们可以使用 VGG 模型来预测特征并将它们用作现有模型的输入。我们将执行后者,并使用数据准备期间使用的extract_features() 函数的修改版本,但适用于处理单张照片。
# extract features from each photo in the directory
def extract_features(filename):
    # load the model
    model = VGG16()
    # re-structure the model
    model = Model(inputs=model.inputs, outputs=model.layers[-2].output)
    # load the photo
    image = load_img(filename, target_size=(224, 224))
    # convert the image pixels to a numpy array
    image = img_to_array(image)
    # reshape data for the model
    image = image.reshape((1, image.shape[0], image.shape[1], image.shape[2]))
    # prepare the image for the VGG model
    image = preprocess_input(image)
    # get features
    feature = model.predict(image, verbose=0)
    return feature

# load and prepare the photograph
photo = extract_features('example.jpg')
然后,我们可以使用评估模型时定义的generate_desc() 函数生成描述。
下面列出了为全新的独立照片生成描述的完整示例。
from pickle import load
from numpy import argmax
from keras.preprocessing.sequence import pad_sequences
from keras.applications.vgg16 import VGG16
from keras.preprocessing.image import load_img
from keras.preprocessing.image import img_to_array
from keras.applications.vgg16 import preprocess_input
from keras.models import Model
from keras.models import load_model

# extract features from each photo in the directory
def extract_features(filename):
    # load the model
    model = VGG16()
    # re-structure the model
    model = Model(inputs=model.inputs, outputs=model.layers[-2].output)
    # load the photo
    image = load_img(filename, target_size=(224, 224))
    # convert the image pixels to a numpy array
    image = img_to_array(image)
    # reshape data for the model
    image = image.reshape((1, image.shape[0], image.shape[1], image.shape[2]))
    # prepare the image for the VGG model
    image = preprocess_input(image)
    # get features
    feature = model.predict(image, verbose=0)
    return feature

# map an integer to a word
def word_for_id(integer, tokenizer):
    for word, index in tokenizer.word_index.items():
        if index == integer:
            return word
    return None

# generate a description for an image
def generate_desc(model, tokenizer, photo, max_length):
    # seed the generation process
    in_text = 'startseq'
    # iterate over the whole length of the sequence
    for i in range(max_length):
        # integer encode input sequence
        sequence = tokenizer.texts_to_sequences([in_text])[0]
        # pad input
        sequence = pad_sequences([sequence], maxlen=max_length)
        # predict next word
        yhat = model.predict([photo,sequence], verbose=0)
        # convert probability to integer
        yhat = argmax(yhat)
        # map integer to word
        word = word_for_id(yhat, tokenizer)
        # stop if we cannot map the word
        if word is None:
            break
        # append as input for generating the next word
        in_text += ' ' + word
        # stop if we predict the end of the sequence
        if word == 'endseq':
            break
    return in_text

# load the tokenizer
tokenizer = load(open('tokenizer.pkl', 'rb'))
# pre-define the max sequence length (from training)
max_length = 34
# load the model
model = load_model('model-ep002-loss3.245-val_loss3.612.h5')
# load and prepare the photograph
photo = extract_features('example.jpg')
# generate description
description = generate_desc(model, tokenizer, photo, max_length)
print(description)
注意:根据算法或评估过程的随机性质或数值精度的差异,您的结果可能会有所不同。请考虑运行几次示例并比较平均结果。
在这种情况下,生成的描述如下:
startseq dog is running across the beach endseq您可以删除开始和结束标记,您将拥有一个不错的自动照片字幕模型的基础。
就像生活在未来的家伙!
我仍然完全相信我们可以做到这一点。哇。
本站文章如无特殊说明,均为本站原创,如若转载,请注明出处:(实战篇)从头开发基于深度学习的照片说明器! - Python技术站
 微信扫一扫
微信扫一扫  支付宝扫一扫


![[Tensorflow] 使用 model.save_weights() 保存 / 加载 Keras Subclassed Model](https://pythonjishu.com/wp-content/uploads/2023/04/HYdLVCwEXpYN20230406-480x300.jpg)