一、 前言
搭建和维护集群环境中时钟同步是非常重要一环。如果集群的时间不统一,例如ceph集群就会报错无法更新数据、CDH集群无法添加客户端等等。目前主流在Linux系统搭建集群用到NTP和chrony软件,本文简单介绍两者的集群搭建。
二、 NTP和chrony区别
根据chrony官网描述,主要区别如下图:(图太大了,截取了一部分)
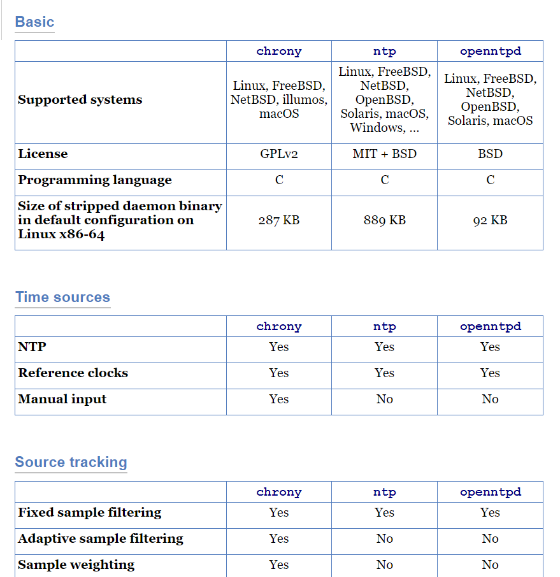
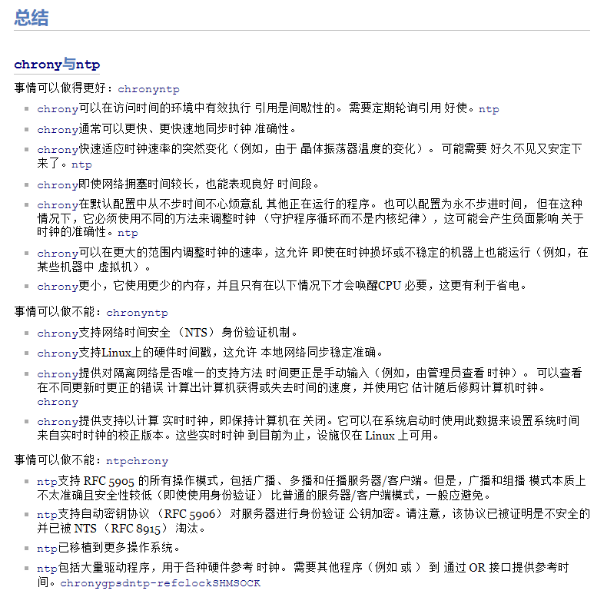
详细见官网:chrony – NTP 实施的比较
三、 环境准备
注意:ntp和chrony无法同时再一台机器运行;请单独安装运行

ntp下载地址(Centos7):
http://mirror.centos.org/centos/7/os/x86_64/Packages/ntp-4.2.6p5-29.el7.centos.2.x86_64.rpm
http://mirror.centos.org/centos/7/os/x86_64/Packages/ntpdate-4.2.6p5-29.el7.centos.2.x86_64.rpm
chrony下载地址(Centos7):
http://mirror.centos.org/centos/7/os/x86_64/Packages/chrony-3.4-1.el7.x86_64.rpm
四、 NTP搭建集群同步时间
1、 更新阿里源、安装ntp|ntpdate
离线环境提前下载离线包
#更新阿里源
cd /etc/yum.repos.d/
curl -L -O https://mirrors.aliyun.com/repo/Centos-7.repo && mv ./Centos-7.repo /etc/yum.repos.d/CentOS-Base.repo
sed -i -e '/mirrors.cloud.aliyuncs.com/d' -e '/mirrors.aliyuncs.com/d' /etc/yum.repos.d/CentOS-Base.repo
curl -L -O  http://mirrors.aliyun.com/repo/epel-7.repo && mv ./epel-7.repo /etc/yum.repos.d/epel.repo
yum clean all && yum makecache
yum install -y epel-*

#安装NTP
rpm -qa | grep ntp
yum -y remove ntpdate ntp
yum -y install ntp  ntpdate

#设置时区上海
timedatectl set-timezone Asia/Shanghai
date
mv /etc/localtime /etc/localtime.bak
ln -s /usr/share/zoneinfo/Asia/Shanghai /etc/localtime
timedatectl set-timezone Asia/Shanghai

2、 离线环境:3台机器时钟同步其中一台
将192.168.1.131作为主节点,其他节点都同步它,允许同步网段设置为192.168.1.0
● 主节点选择192.168.1.131,修改主节点配置文件
#主节点:修改配置文件
mv /etc/ntp.conf /etc/ntp.conf.bakk
cat >>/etc/ntp.conf<<EOF
driftfile /var/lib/ntp/drift
restrict default nomodify notrap nopeer noquery
restrict 192.168.1.131 nomodify notrap nopeer noquery
restrict 127.0.0.1
restrict ::1
restrict 192.168.1.0 mask 255.255.255.0 nomodify notrap
server 127.127.1.0
fudge 127.127.1.0 stratum 10
includefile /etc/ntp/crypto/pw
keys /etc/ntp/keys
disable monitor
EOF
cat /etc/ntp.conf
#需要把对应restrict IP和restrict网段进行修改即可
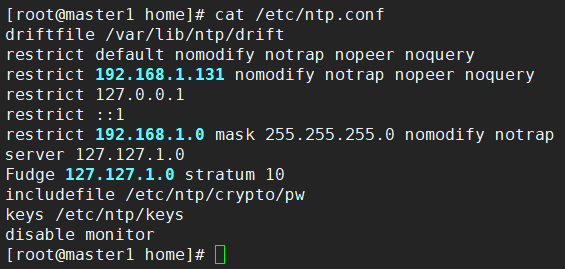
● 其他节点作为客户端192.168.1.132/133,修改其他节点配置文件
#其他节点:ntp客户端配置
mv /etc/ntp.conf /etc/ntp.conf.bakk
cat >>/etc/ntp.conf<<EOF
driftfile /var/lib/ntp/drift
restrict default nomodify notrap nopeer noquery
restrict 127.0.0.1
restrict ::1
restrict 192.168.1.0 mask 255.255.255.0 nomodify notrap
server 192.168.1.131
fudge 192.168.1.131 stratum 10
includefile /etc/ntp/crypto/pw
keys /etc/ntp/keys
disable monitor
EOF
cat /etc/ntp.conf
#需要把对应server Fudge IP和restrict网段进行修改即可
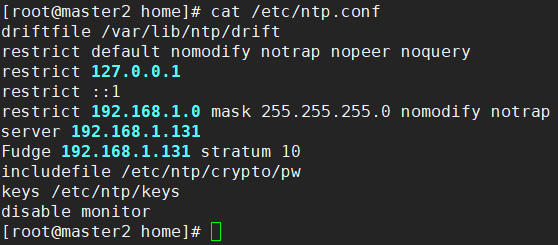
● 注意:先启动主节点的NTP服务、再启动其他节点
#主节点执行同步
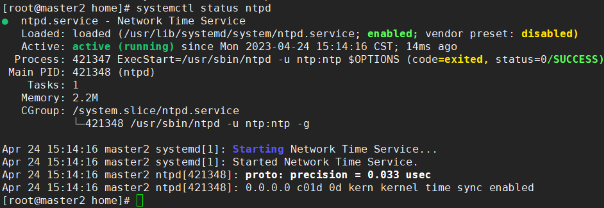
systemctl restart ntpd
systemctl status ntpd
#systemctl enable ntpd

● 同步硬件时间,检查集群同步状态,关闭chyony
#其他节点执行同步
ntpdate -u 192.168.1.131

#同步硬件时间
sed -i 's#SYNC_HWCLOCK=no#SYNC_HWCLOCK=yes#g' /etc/sysconfig/ntpdate
hwclock -w
hwclock -r


#检查是否成功
ntpstat
ntpq -p
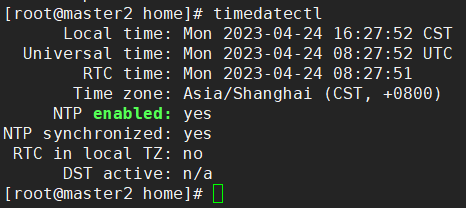
timedatectl

#会冲突,需要停止chronyd.service
systemctl stop chronyd.service
systemctl disable chronyd.service


3、 在线环境:3台机器同步外网时钟服务器即可
在线环境同步时间
#手动同步
ntpdate -u ntp.ntsc.ac.cn

#写入配置文件自动同步
mv /etc/ntp.conf /etc/ntp.conf.bakk
cat >>/etc/ntp.conf<<EOF
driftfile /var/lib/ntp/drift
restrict default nomodify notrap nopeer noquery
restrict 127.0.0.1
restrict ::1
restrict 192.168.1.0 mask 255.255.255.0 nomodify notrap
server ntp.ntsc.ac.cn
fudge ntp.ntsc.ac.cn stratum 10
includefile /etc/ntp/crypto/pw
keys /etc/ntp/keys
disable monitor
EOF
cat /etc/ntp.conf

4、 开放端口123
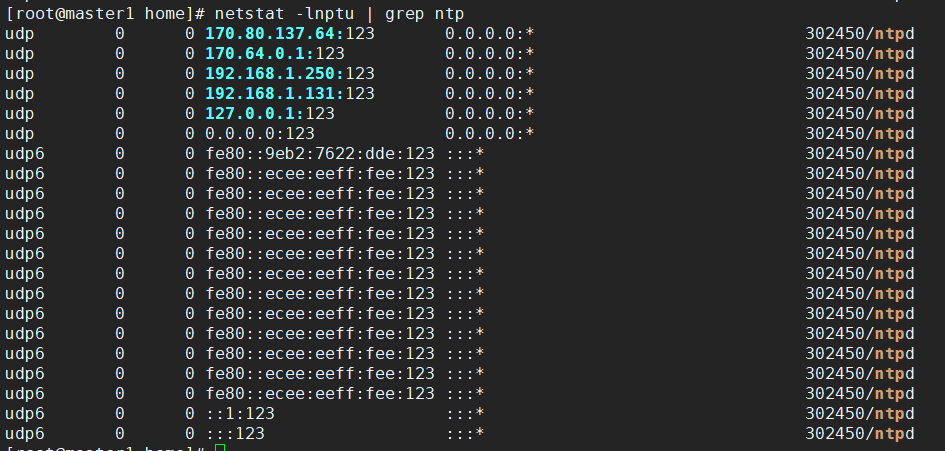
如果无法同步,请检查防火墙是否开放端口123
netstat -lnptu | grep ntp

#关闭防火墙和selinux
systemctl stop firewalld.service
systemctl disable firewalld.service
setenforce 0
sed -i 's/SELINUX=enforcing/SELINUX=disabled/g' /etc/sysconfig/selinux
sed -i 's/SELINUX=enforcing/SELINUX=disabled/g' /etc/selinux/config
sestatus
五、 chrony搭建集群同步时间
1、 更新阿里源、安装chony
离线环境提前下载离线包
#更新阿里源
cd /etc/yum.repos.d/
curl -L -O https://mirrors.aliyun.com/repo/Centos-7.repo && mv ./Centos-7.repo /etc/yum.repos.d/CentOS-Base.repo
sed -i -e '/mirrors.cloud.aliyuncs.com/d' -e '/mirrors.aliyuncs.com/d' /etc/yum.repos.d/CentOS-Base.repo
curl -L -O  http://mirrors.aliyun.com/repo/epel-7.repo && mv ./epel-7.repo /etc/yum.repos.d/epel.repo
yum clean all && yum makecache
yum install -y epel-*

#安装chrony
rpm -qa | grep chrony
yum -y remove chrony
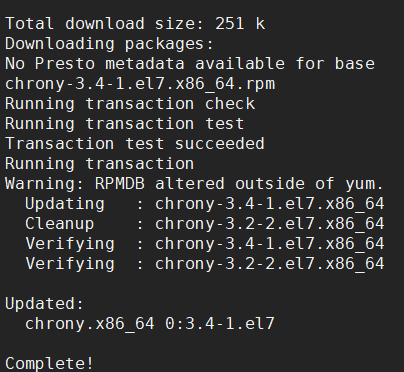
yum -y install chrony

#设置时区上海
timedatectl set-timezone Asia/Shanghai
date
mv /etc/localtime /etc/localtime.bak
ln -s /usr/share/zoneinfo/Asia/Shanghai /etc/localtime
timedatectl set-timezone Asia/Shanghai
2、 离线环境:3台机器时钟同步其中一台
将192.168.1.131作为主节点,其他节点都同步它,允许同步网段设置为192.168.1.0
● 主节点选择192.168.1.131,修改主节点配置文件
#主节点:修改配置文件
mv /etc/chrony.conf /etc/chrony.conf.bakk
cat >> /etc/chrony.conf<<EOF
server 192.168.1.131 iburst
server 127.0.0.1 iburst
driftfile /var/lib/chrony/drift
makestep 1.0 3
rtcsync
allow 192.168.1.0/24
local stratum 10
logdir /var/log/chrony
EOF
cat /etc/chrony.conf
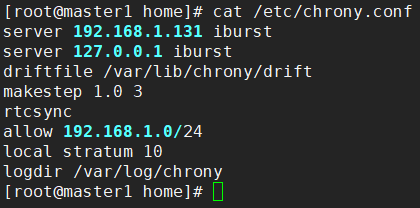
● 主节点选择192.168.1.131,修改主节点配置文件
#其他节点:修改配置文件
mv /etc/chrony.conf /etc/chrony.conf.bakk
cat >> /etc/chrony.conf<<EOF
server 192.168.1.131 iburst
driftfile /var/lib/chrony/drift
makestep 1.0 3
rtcsync
local stratum 10
logdir /var/log/chrony
EOF
cat /etc/chrony.conf
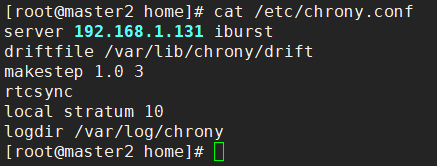
● 注意:先启动主节点的NTP服务、再启动其他节点
#先停止ntp\ntpdate服务
systemctl stop ntpd.service
systemctl stop ntpdate.service

#再启动chronyd
systemctl restart chronyd.service
systemctl status chronyd.service

#等几秒可以查看同步状态
chronyc sources -v
chronyc clients
timedatectl
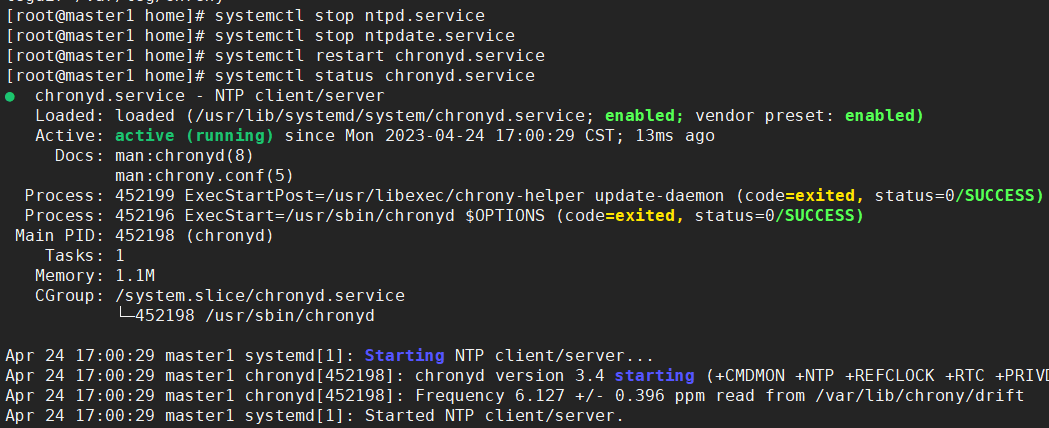


3、 在线环境:3台机器同步外网时钟服务器即可
#写入配置文件自动同步
mv /etc/chrony.conf /etc/chrony.conf.bakk
cat >> /etc/chrony.conf<<EOF
server ntp.ntsc.ac.cn iburst
server 127.0.0.1 iburst
driftfile /var/lib/chrony/drift
makestep 1.0 3
rtcsync
allow 192.168.1.0/24
local stratum 10
logdir /var/log/chrony
EOF
cat /etc/chrony.conf
4、 开放端口123和323
下面是 Chrony 服务使用的默认端口:
● UDP 端口 123:Chrony 客户端和服务器都使用此端口进行 NTP 数据包通信。
● TCP 端口 323:如果需要,Chrony 可以使用此端口进行监视和配置。

原文链接:https://www.cnblogs.com/subsea/p/17350326.html
本站文章如无特殊说明,均为本站原创,如若转载,请注明出处:集群时钟同步必读-NTP和chrony - Python技术站

 微信扫一扫
微信扫一扫  支付宝扫一扫