SpringBoot 集成 SpringSecurity + MySQL + JWT 附源码,废话不多直接盘
SpringBoot已经为用户采用默认配置,只需要引入pom依赖就能快速启动Spring Security。
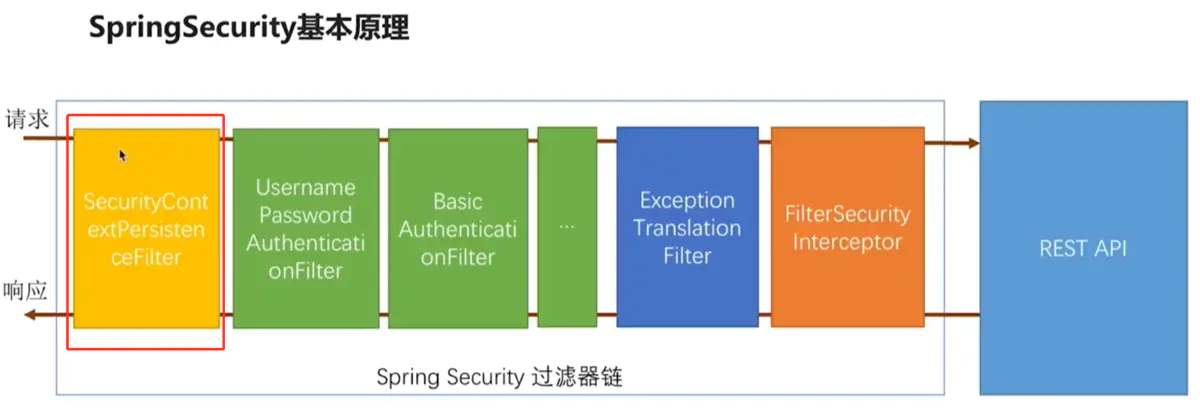
目的:验证请求用户的身份,提供安全访问
优势:基于Spring,配置方便,减少大量代码

内置访问控制方法
permitAll()表示所匹配的 URL 任何人都允许访问。authenticated()表示所匹配的 URL 都需要被认证才能访问。anonymous()表示可以匿名访问匹配的 URL 。和 permitAll() 效果类似,只是设置为 anonymous() 的 url 会执行 filter 链中denyAll()表示所匹配的 URL 都不允许被访问。rememberMe()被“remember me”的用户允许访问 这个有点类似于很多网站的十天内免登录,登陆一次即可记住你,然后未来一段时间不用登录。fullyAuthenticated()如果用户不是被 remember me 的,才可以访问。也就是必须一步一步按部就班的登录才行。
角色权限判断
hasAuthority(String)判断用户是否具有特定的权限,用户的权限是在自定义登录逻辑hasAnyAuthority(String ...)如果用户具备给定权限中某一个,就允许访问hasRole(String)如果用户具备给定角色就允许访问。否则出现 403hasAnyRole(String ...)如果用户具备给定角色的任意一个,就允许被访问hasIpAddress(String)如果请求是指定的 IP 就运行访问。可以通过 request.getRemoteAddr() 获取 ip 地址
引用 Spring Security
Pom 文件中添加
<dependency>
   <groupId>org.springframework.boot</groupId>
   <artifactId>spring-boot-starter-security</artifactId>
</dependency>
点击查看POM代码
<?xml version="1.0" encoding="UTF-8"?>
<project xmlns="http://maven.apache.org/POM/4.0.0"
         xmlns:xsi="http://www.w3.org/2001/XMLSchema-instance"
         xsi:schemaLocation="http://maven.apache.org/POM/4.0.0 http://maven.apache.org/xsd/maven-4.0.0.xsd">
    <parent>
        <artifactId>vipsoft-parent</artifactId>
        <groupId>com.vipsoft.boot</groupId>
        <version>1.0-SNAPSHOT</version>
    </parent>
    <modelVersion>4.0.0</modelVersion>

    <artifactId>vipsoft-security</artifactId>
    <version>1.0-SNAPSHOT</version>

    <dependencies>

        <dependency>
            <groupId>cn.hutool</groupId>
            <artifactId>hutool-all</artifactId>
            <version>5.3.7</version>
        </dependency>

        <dependency>
            <groupId>org.springframework.boot</groupId>
            <artifactId>spring-boot-starter-security</artifactId>
        </dependency>

        <dependency>
            <groupId>org.springframework.boot</groupId>
            <artifactId>spring-boot-starter-web</artifactId>
        </dependency>
        <dependency>
            <groupId>org.springframework.boot</groupId>
            <artifactId>spring-boot-starter-test</artifactId>
            <scope>test</scope>
            <exclusions>
                <exclusion>
                    <groupId>org.junit.vintage</groupId>
                    <artifactId>junit-vintage-engine</artifactId>
                </exclusion>
            </exclusions>
        </dependency>

    </dependencies>

    <build>
        <plugins>
            <plugin>
                <groupId>org.springframework.boot</groupId>
                <artifactId>spring-boot-maven-plugin</artifactId>
            </plugin>
        </plugins>
    </build>

</project>
运行后会自动生成 password 默认用户名为: user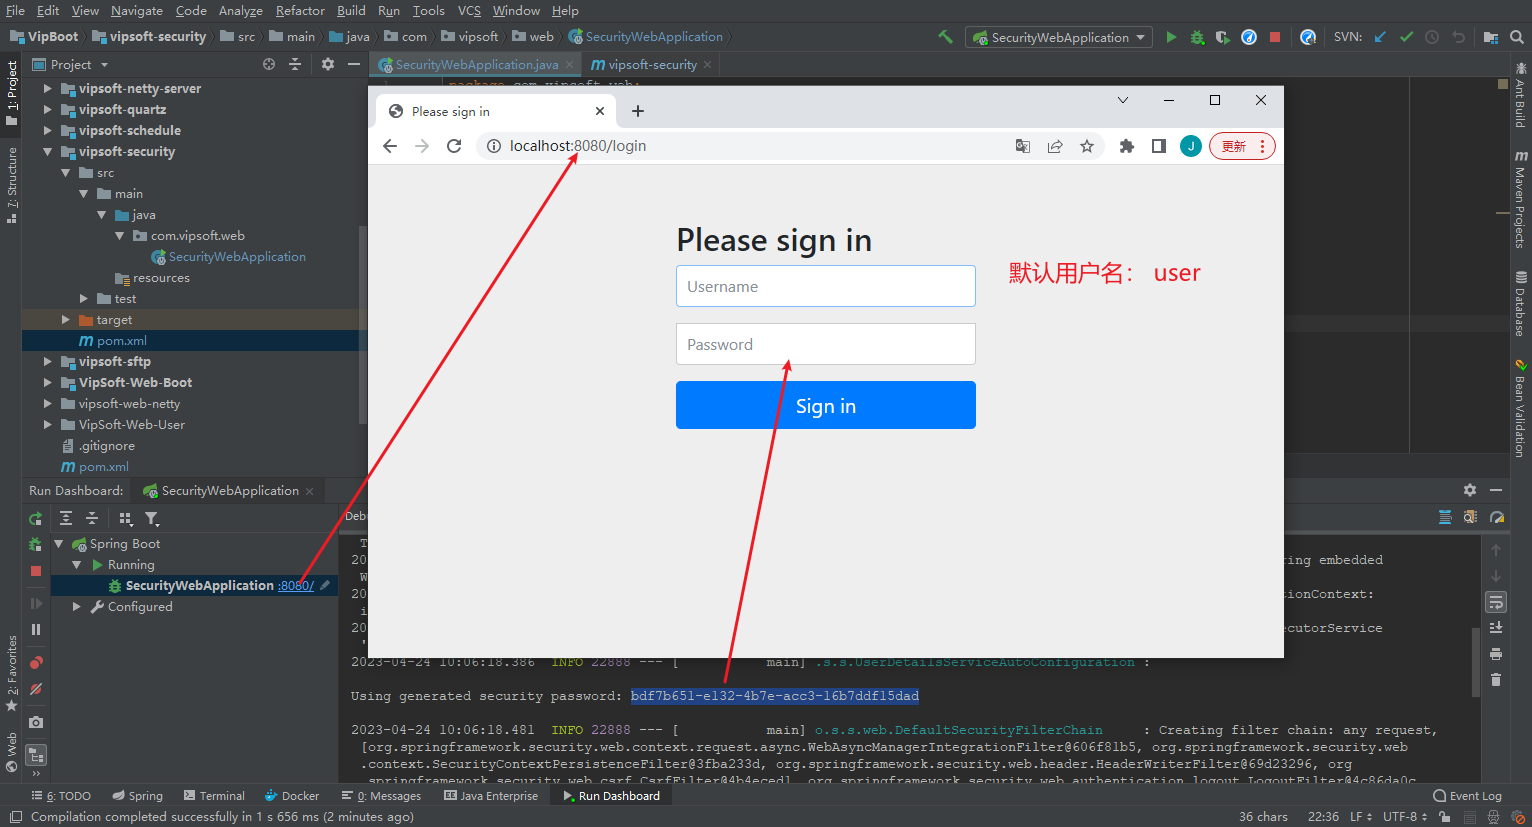
默认配置每次都启动项目都会重新生成密码,同时用户名和拦截请求也不能自定义,在实际应用中往往需要自定义配置,因此接下来对Spring Security进行自定义配置。
配置 Spring Security (入门)
在内存中(简化环节,了解逻辑)配置两个用户角色(admin和user),设置不同密码;
同时设置角色访问权限,其中admin可以访问所有路径(即/*),user只能访问/user下的所有路径。
自定义配置类,实现WebSecurityConfigurerAdapter接口,WebSecurityConfigurerAdapter接口中有两个用到的 configure()方法,其中一个配置用户身份,另一个配置用户权限:
配置用户身份的configure()方法:
SecurityConfig
package com.vipsoft.web.config;

import org.springframework.context.annotation.Configuration;
import org.springframework.security.config.annotation.authentication.builders.AuthenticationManagerBuilder;
import org.springframework.security.config.annotation.method.configuration.EnableGlobalMethodSecurity;
import org.springframework.security.config.annotation.web.builders.HttpSecurity;
import org.springframework.security.config.annotation.web.configuration.EnableWebSecurity;
import org.springframework.security.config.annotation.web.configuration.WebSecurityConfigurerAdapter;
import org.springframework.security.crypto.bcrypt.BCryptPasswordEncoder;
import org.springframework.security.crypto.password.PasswordEncoder;

@Configuration
@EnableWebSecurity
@EnableGlobalMethodSecurity(prePostEnabled = true)
public class SecurityConfig extends WebSecurityConfigurerAdapter {

    /**
     * 配置用户身份的configure()方法
     *
     * @param auth
     * @throws Exception
     */
    @Override
    protected void configure(AuthenticationManagerBuilder auth) throws Exception {
        PasswordEncoder passwordEncoder = new BCryptPasswordEncoder();
        //简化操作,将用户名和密码存在内存中,后期会存放在数据库、Redis中
        auth.inMemoryAuthentication()
                .passwordEncoder(passwordEncoder)
                .withUser("admin")
                .password(passwordEncoder.encode("888"))
                .roles("ADMIN")
                .and()
                .withUser("user")
                .password(passwordEncoder.encode("666"))
                .roles("USER");
    }

    /**
     * 配置用户权限的configure()方法
     * @param http
     * @throws Exception
     */
    @Override
    protected void configure(HttpSecurity http) throws Exception {
        http.authorizeRequests()
                //配置拦截的路径、配置哪类角色可以访问该路径
                .antMatchers("/user").hasAnyRole("USER")
                .antMatchers("/*").hasAnyRole("ADMIN")
                //配置登录界面,可以添加自定义界面, 没添加则用系统默认的界面
                .and().formLogin();

    }
}
添加接口测试用
package com.vipsoft.web.controller;

import org.springframework.security.access.prepost.PreAuthorize;
import org.springframework.web.bind.annotation.GetMapping;
import org.springframework.web.bind.annotation.RestController;

@RestController
public class DefaultController {

    @GetMapping("/")
    @PreAuthorize("hasRole('ADMIN')")
    public String demo() {
        return "Welcome";
    }

    @GetMapping("/user/list")
    @PreAuthorize("hasAnyRole('ADMIN','USER')")
    public String getUserList() {
        return "User List";
    }

    @GetMapping("/article/list")
    @PreAuthorize("hasRole('ADMIN')")
    public String getArticleList() {
        return "Article List";
    }
}

原文链接:https://www.cnblogs.com/vipsoft/p/17348599.html
本站文章如无特殊说明,均为本站原创,如若转载,请注明出处:SpringBoot SpringSecurity 介绍(基于内存的验证) - Python技术站
 微信扫一扫
微信扫一扫  支付宝扫一扫